Configuring Sources
Note:
Configuration of sources is regularly evolving and curretly requires access to the kubernetes custer. This document covers responsibilities shared by both the Deployment Engineer and Admin.
Atolio can be configured to index content across a variety of sources. This document describes the steps required in both the source systems and within Atolio:
- First, follow the steps required in the source system (links provided below).
- Then, provide the necessary configuration to your Deployment Engineer in order to setup the Atolio connector in your environment as outlined in Atolio Configuration.
Atolio Configuration
All source configuration in Atolio is currently performed by your Deployment Engineer. It is accomplished using atolioctl which is a terminal based UI (TUI) that allows your Deployment Engineer to configure all available sources. In the future, this interface will be a browser-based IT Administrator function.
Installing atolioctl
Atolio provides an installer script within the lumen-infra repository that will automatically grab the latest version of atolioctl and install it locally.
Note:
The installer script requires that you have curl or wget installed:
- Navigate to the
lumen-infra repository and into the scripts directory
cd lumen-infra/deploy/terraform/scripts
- Run the installer script
- From there, you should be able to run the tool:
atolioctl --help
You can re-run this script to download the latest version of atolioctl or run the script with the --version flag to install a specific version of atolioctl, ex:
./get-atolioctl.sh --version 4.10.2
Deploying Connectors
Prior to configuring a source, the connector (ie the deployment in which the source will run on) must be deployed. Atolio uses the concept of instances to support one or more instances of a source (eg multiple tenants), and the creation of these deployments is managed by modifying values-lumen.yaml. Specify connectors like so:
connectors:
  microsoft:
    default:
      enabled: true
  okta:
    default:
      enabled: true
  jiracloud:
    default:
      enabled: true
Connectors are deployed under a default instance. This is an identifier which can be changed as desired, and multiple connectors can be deployed under different instances. Once the instance is set, it should be treated immutable. Modifying this value will result in loss of data and a need to re-index under the new instance. This is due to the instance being part of every resource identifier ingested by Atolio.
  jiracloud:
    internal:
      enabled: true
    external:
      enabled: true
Customizing Connector Deployments
The above YAML examples are the minimal definitions required to deploy a connector to your Atolio cluster. There are additional properties that can be set in your values-lumen.yaml file as directed by your Atolio support team to apply different options. For example:
connectors:
  google:
    default:
      enabled: true
      lumenImageTag: 4.13.0-alpha1
      log:
        level: "debug"
      resources:
        requests:
          cpu: 500m
          memory: 2Gi
        limits:
          cpu: 1000m
          memory: 4Gi
To provision the updates into the cluster, you’d upgrade the lumen Helm chart by running create-infra.sh (recommended) or:
helm upgrade lumen-chart ../../k8s/charts/lumen --values values-lumen.yaml --values values-lumen-templated.yaml -n atolio-svc
Configuring Sources
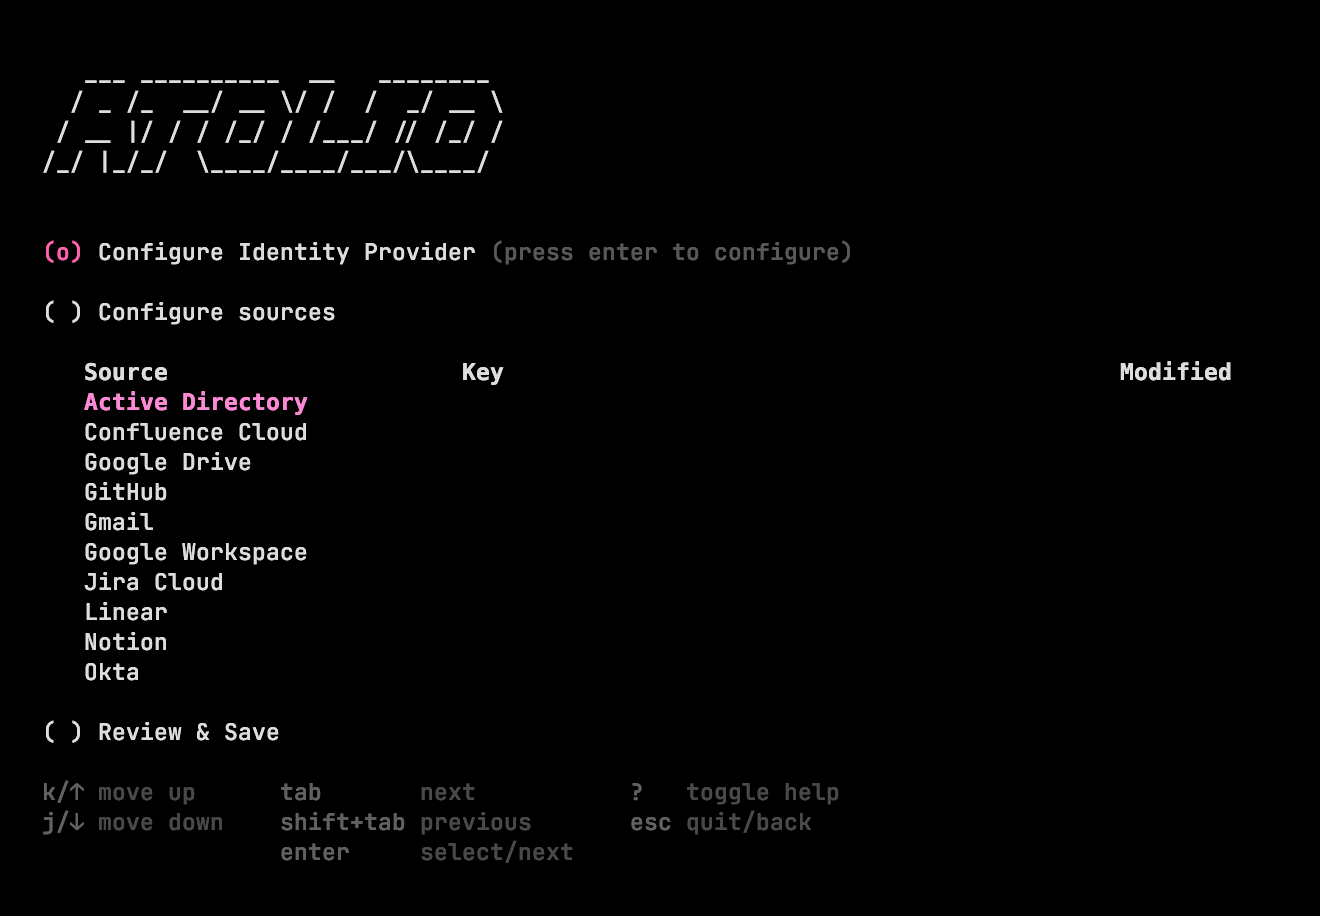
All source configuration is accomplished through atolioctl which can be obtained through the Releases page. This is a terminal based UI (TUI) which allows an administrator to configure all available sources. In the future, this interface will be browser based.
This section details how to configure each source, including how to obtain the necessary JWT.
First an API token needs to be created for use with atolioctl. This token can be generated as follows using the config.hcl file that was used to run the create-infra.sh script:
export JWT_TOKEN=$(atolioctl connector create-jwt --raw --config-dir . "atolio:*:*:*")
Feeder exposed on Load Balancer
To run configuration, provide the configure command to atolioctl. Make sure to use the correct API host name for your deployment. Once loaded, you should see a collection of configuration options and sources in your terminal:
atolioctl configure --jwt-token-sdk ${JWT_TOKEN} --feeder-address feed.search.example.com:443
Port Forwarding (Feeder not exposed on Load Balancer)
To run configuration, port-forward 8889 from service/feeder and provide the configure command to atolioctl. Ensure the correct AWS profile is in context. Once loaded, you should see a collection of configuration options and sources in your terminal:
kubectl port-forward -n atolio-svc service/feeder 8889
atolioctl configure --jwt-token-sdk ${JWT_TOKEN} --feeder-address :8889
Note that for the time being all atolioctl commands below (unless noted otherwise) will require the port forwarding command.
Configuration Tips
To obtain source-specific information, head to source configuration and find the source you’re interested in configuring. Some tips when running atolioctl:
- Run the application in a maximized window to ensure full visibility of all information.
- Press
? to toggle the help menu / key map. You will typically use up/down arrows and <TAB> to navigate the menus. - No data is persisted until
Review & Save is selected and validation has completed. A report will be shown detailing which sources were successfully configured and which not.
YAML export/import
As a reminder, the stack is not yet running at this point. Configuration of most sources does not require an operational stack as the validation is simply making a call to the source API and there is no expectation of the source’s connector running yet. There are some exceptions (in particular Jira, Confluence, and BitBucket)
Once desired sources have been configured and the stack deployed, you can import the pre-configured file. Note at this point it’s expected Feeder is operational and port-forwarding to the service address can occur:
atolioctl configure import atolio.yaml --jwt-token-sdk ${JWT_TOKEN} --feeder-address :8889
Writing key: /lumen/connectors/github/default/github
Writing key: /lumen/connectors/linear/default/linear
Writing key: /lumen/connectors/notion/default/notion
Writing key: /lumen/connectors/slack/default/slack
Writing key: /lumen/connectors/web/default/web
Writing key: /lumen/connectors/bitbucket/default/bitbucket
Similarly, source configuration of the stack can be exported to a local file. This can be useful if wishing to view the entire configuration in a human-readable YAML file, or perhaps store a backup of the configuration in a vault like 1Password. This file will be in the same format as the one imported in the prior step, allowing a loop of export, modify, import:
atolioctl configure export --jwt-token-sdk ${JWT_TOKEN} --feeder-address :8889 atolio.yaml
Both export and import commands can also combined into a single edit command that exports the current source configuration into a text editor (specified by the EDITOR environment variable) allowing manual edits. Upon saving/closing the editor, the configuration will be imported. This command is invoked a follows:
atolioctl configure edit --jwt-token-sdk ${JWT_TOKEN} --feeder-address :8889
Common Fields: Resources
Atolio supports the ability to avoid certain content from being indexed at all. The example below shows how to specifically exclude a Jira project (with the project key “SP”).
When configuring the Jira source, enter the following in the Resources field:
project:
    excluded:
        - "SP" # The Secret Project
The excluded keyword contains a list of Jira project keys to be excluded from indexing. Similarly you can also use the included keyword to achieve the opposite (in that case only those resources that are specifically listed will be indexed, nothing else). Note that the list entries (e.g. SP in the example above) are case sensitive.
In the absence of both included (opt-in) or excluded (opt-out), everything that the credentials (e.g. API key) have access to will be indexed. Note that this is a layer on top of the permissions model provided to the source. Anything added to included will only be indexed if the underlying credentials grant the indexing job access.
This feature is supported by a majority of Atolio connectors, see each connectors respective documentation for details and scope of inclusions / exclusions.
Source Configuration
1 - Atlassian Bitbucket Connector
Index repositories, projects, pull requests, commits, and comments in Bitbucket.
The Atlassian Bitbucket connector indexes repositories, projects, pull requests, commits, and comments across your Bitbucket instance.
The connector supports Atlassian Bitbucket Cloud.
Installing the Bitbucket App Descriptor
In order to target your specific Atolio deployment, the Atlassian Bitbucket connector requires a private listing to be installed instead of the Atlassian marketplace version. This can be disabled again after the connect app is installed.
In your Bitbucket instance:
- Under
Settings -> Workplace settings, navigate to Installed apps under the APPS AND FEATURES section. - After clicking Enable development mode, click the link for
Install app from URL.

- Specify the URL provided by your Deployment Engineer. It will be similar to the following with your chosen DNS name:
https://relay.search.example.com/connectors/bitbucketcloud/default/install/atlassian-connect.json- Note: if you have multiple Bitbucket instances, please make sure to provide the correct instance name in the URL above (i.e.
default in the example).
Once the Atolio Connect app has been installed, the configuration will be stored securely in your Atolio deployment. You can now disable the development mode as needed.
2 - Atlassian Confluence Connector
Index spaces, pages, and comments in Confluence.
The Atlassian Confluence connector indexes spaces, pages, and comments across your Confluence instance.
The connector supports Atlassian Confluence Cloud.
Installing the Confluence App Descriptor
In order to target your specific Atolio deployment, the Atlassian Confluence connector requires a private listing to be installed instead of the Atlassian marketplace version, as explained here. This can be disabled again after the connect app is installed.
To start, within your Confluence instance:
- Navigate to the application management page by clicking
Apps -> Manage your apps. - Click
Settings at the bottom, then enable private listings and development mode before clicking Apply.

- The
Upload app link will now be enabled.

- Specify the URL provided by your Deployment Engineer. It will be similar to the following with your chosen DNS name:
https://relay.search.example.com/connectors/confluencecloud/default/install/atlassian-connect.json- Note: if you have multiple Confluence instances, please make sure to provide the correct instance name in the URL above (i.e.
default in the example).
Once the Atolio Connect app has been installed, the configuration will be stored securely in your Atolio deployment. You can now disable the development mode and private listings as needed.
(Optional) Scope Confluence indexing
If you want fine-grained control over which Confluence spaces should be indexed, provide a list of inclusions or exclusions to your Deployment Engineer: they can use the includes or excludes feature in Atolio configuration to control the relevant spaces that should be indexed.
3 - Atlassian Connector for Jira & Confluence Data Center
Index content from your Jira DC & Confluence DC environments.
The Atlassian Connector for Jira & Confluence Data Center indexes:
- Projects, issues, and comments across your Jira instance.
- Spaces, pages, and comments across your Confluence instance.
- Users and groups in Jira & Confluence for the purpose of understanding permissions.
The apps have been created with Atlassian SDK and designed to be installed and work for:
- Confluence Server/DC v8.2.3 or later.
- Jira Server/DC v9.10.0 or later.
Installing the App
First, check if you can upload apps by following these steps:
- Navigate to Administration (gear icon) and click on
Manage apps. - Under ATLASSIAN MARKETPLACE, click on
Manage apps. - Look for the
Upload app link on the right. - If you are unable to upload plugins on your instance, be sure to enable this option on your instance:

- Click on
Upload app. - Download the plugin file:
a. For Jira, https://artifacts-public.atolio.team/atlassian/jira-dc-connector-v4.14.3.jar
b. For Confluence, https://artifacts-public.atolio.team/atlassian/confluence-dc-connector-v4.14.3.jar
- Provide the file for installation and click
Upload. - Ensure that the plugin is installed.
Note: you may choose to disable plugin uploads after this step, following the instructions above.
Provide Configuration
Before your configure the plugin, you will need to work with your Deployment Engineer to generate an authentication token for the Jira DC or Confluence DC connector instance. To generate the necessary token, have them run the following command with the appropriate arguments:
atolioctl connector create-jwt "atolio:jiradc:default:jiradc" --jwt-secret-sdk <secret> --jwt-audience-sdk https://search.example.com --jwt-issuer-sdk https://search.example.com
The issuer and audience are based on the domain name as specified in config.hcl (i.e. the Terraform lumen_domain_name variable with the URL scheme https:// prefixed).
If you have the values-lumen.yaml and values-lumen-templated.yaml locally available you can run the following command instead (the directory is e.g. deploy/terraform/aws):
atolioctl connector create-jwt --config-dir your-config-dir "atolio:jiradc:default:jiradc"
You can now configure the plugin to point to your Atolio deployment:
- Under the app, click on
Configure. - Under “Feeder Settings”, provide the following:
- Host - the feeder address, which will be the
feed subdomain with your chosen DNS name, e.g. feed.search.example.com. - Port - the port to communicate on, e.g.
443. - JWT Token - the token generated by your Deployment Engineer.
- (Optional) Under “Project Settings”, you can choose to index all projects or specify certain projects.
- Under “Backfiller Status”, click
Start Process.
4 - Atlassian Jira Connector
Index projects, issues, and comments in Jira.
The Atlassian Jira connector indexes projects, issues, and comments across your Jira instance.
The connector supports Atlassian Jira Cloud.
Installing the Jira App Descriptor
In order to target your specific Atolio deployment, the Atlassian Jira connector requires a private listing to be installed instead of the Atlassian marketplace version, as explained here. This can be disabled again after the connect app is installed.
To start, within your Jira instance:
- Navigate to the application management page by clicking
Apps -> Manage your apps. - Click
Settings at the bottom, then enable private listings and development mode before clicking Apply.

- The
Upload app link will now be enabled.

- Specify the URL provided by your Deployment Engineer. It will be similar to the following with your chosen DNS name:
https://relay.search.example.com/connectors/jiracloud/default/install/atlassian-connect.json- Note: if you have multiple Jira instances, please make sure to provide the correct instance name in the URL above (i.e.
default in the example).
Once the Atolio Connect app has been installed, the configuration will be stored securely in your Atolio deployment. You can now disable the development mode and private listings as needed.
(Optional) Scope Jira indexing
If you want fine-grained control over which Jira projects should be indexed, provide a list of inclusions or exclusions to your Deployment Engineer: they can use the includes or excludes feature in Atolio configuration to control the relevant projects that should be indexed.
5 - GitHub Connector
Index pull requests, commits, comments, and markdown in your GitHub repositories.
The GitHub connector enables the indexing of pull requests, commits, comments, and markdown in your GitHub repositories.
Create Access Token
To install the GitHub connector, use a GitHub account with admin access to the organization (requires read access to teams). Using this account, create a personal access token (currently Classic only) according to these instructions. You will need to ensure repo and user scopes are set (as shown below):

Note: for GitHub Enterprise Server installations, you would need to enable the site_admin scope too.
(Optional) Create GitHub App
Note: GitHub App flow does not work with GitHub Enterprise Server installations. You would need to use a personal access token like above
Instead of using a personal access token, a GitHub app can be created to install the GitHub connector. This provide better rate limits, especially if your org is on Enterprise Cloud. You can create a GitHub app according to these instructions.
You will need to ensure the following app permissions are set:
Repository Permissions:
| Permissions | Value |
|---|
| Administration | Read-only |
| Contents | Read-only |
| Issues | Read-only |
| Metadata | Read-only |
| Pull Requests | Read-only |
Organization Permissions:
| Permissions | Value |
|---|
| Administration | Read-only |
| Members | Read-only |
Setup Webhooks
If live indexing of GitHub content is desired, you will want to setup Webhooks. Go to Settings->Webhooks->Add Webhook. After authentication, you can now setup the webhook with the following configs:
| Config | Value |
|---|
| Payload URL | https://search.example.com/callback/github/ |
| Content type | application/json |
| Secret | Generated value (e.g. openssl rand -base64 32) |
| SSL verification | Enable SSL verification |
| Active | ✅ |
| Which events would you like to trigger this webhook? | Let me select individual events |
The following events are indexed at the repository level:
- Collaborator add, remove, or changed
- Commit comments
- Issues
- Issue comments
- Pull requests
- Pull requests reviews
- Pull requests reviews comments
- Pushes
- Repositories
The following events are indexed at the organization level:
Please manually check the boxes for each of the events above.
Warning:
Setting up webhooks at the organization level will send webhook events for all repositories within the organization. If this is not desireable, please make changes to the configuration to only process and index specific repositories.
Provide Configuration
Provide these configuration values to your Deployment Engineer:
OrgName should be the identifier for your org (e.g. atolio)ApplicationID is your GitHub app ID, can be found at your GitHub app settings page. This field only affects GitHub and GitHub Enterprise Cloud installations with no effects to GitHub Enterprise Server installationsInstallationID is created on the first installation of the GitHub app on your org, can be found at the end of the URL for your installation: https://github.com/organizations/{ORG}/settings/installations/{INSTALLATION_ID}. This field only affects GitHub and GitHub Enterprise Cloud installations with no effects to GitHub Enterprise Server installationsSamlAuthenticationLevel is where you enabled SAML authentication, 2 options: enterprise or orgEnterpriseBaseURL is the hostname of your GitHub Enterprise Server instanceEnterpriseSlug is your GitHub Enterprise name
Note:
If you have many GitHub repositories, it may be worth using the includes or excludes feature in Atolio configuration to control the relevant repositories that should be indexed.
The GitHub connector provides two types of inclusion/exclusions in the resources field of the configuration as illustrated in the example below:
resources:
    repository:
        included:
            - lumen-infra
    file:
        included:
            - .md
The repository name lumen-infra in this example is the repo part in the repository’s URL (which has the following generic format: https://github.com/repos/{owner}/{repo}). The example above will only index the lumen-infra repository.
File filtering is done of the basis of file extension names (including the preceding dot .). The example above will configure the connector to index all markdown files. Note that by default file filtering is completely disabled as it is a relatively time consuming process.
Provide Secrets
Provide these secrets to your Deployment Engineer:
WebhookSecret is the webhook secret previously createdToken is the personal access tokenAppPrivateKey is the GitHub App private key in PEM format
If employees have brought pre-existing GitHub accounts to their company’s GitHub organization, the identity resolver cannot automatically map them to company user identities. For this reason, the GitHub configuration contains a user mapping table. For example, the entries below map two GitHub user IDs to the user’s username (i.e. email address) in the organization:
12345678:  user1@example.com # "user1"
87654321:  user2@example.com # "user2"
The numerical GitHub ID can easily be obtained using the following: https://api.github.com/users/{USERNAME} in a browser where {USERNAME} is replaced with the GitHub username which can be found in the user’s profile (under the full name printed below the user’s avatar). The ID is in the id field of the JSON response. Adding an entry like this for every user will allow Atolio to link the GitHub user IDs to other sources.
6 - GitLab Connector
Index merge requests, commits, and comments in your GitLab projects.
The GitLab connector enables indexing of merge requests, commits, and comments across your GitLab projects. Atolio supports GitLab Server (minimum version v16.5-ee) and GitLab Cloud.
Create Access Token
As an admin, perform the following steps:
- Login as admin user
- Go to
https://gitlab.company.com/-/user_settings/personal_access_tokens - Click “Add New Token”
- Give it a name and expiration date, set scope as
read_api - Copy generated token
Setup Webhooks
If live indexing of GitLab content is desired, you will want to setup Webhooks. If you have GitLab Premium you can set up webhooks for groups. If you don’t have GitLab Premium, you need to set up a webhook for each project separately.
- Go to Settings/Webhooks
- Set URL to
https://relay.{search.company.com}/connectors/gitlab/{instance}/callback/gitlab - Set a strong “secret token”
- Check “Comments”, “Issue Events” and “Merge Request Events” under Triggers
- Keep “Enable SSL verification” checked
You also need to set up system hooks for the GitLab instance. This is done by an admin user and is required for getting live project updates.
- Go to Admin Area/System Hooks
- Set URL to the same as the webhook URL
- Set secret token as the same as the webhook secret token
- Keep “Enable SSL verification” checked
Provide Configuration
With the Access Token and Webhook Secret in hand, provide these configuration values to your Deployment Engineer:
BaseURL is left blank when using gitlab.com. For self-hosted installations specify the base URL for your instance, e.g. gitlab.example.comWebhookSecret is the webhook secret previously createdToken is the personal access token
Note:
If you have many GitLab projects, it may be worth using the includes or excludes feature in Atolio configuration to control the relevant projects that should be indexed.
An example inclusion/exclusion configuration will look like the following:
resources:
  group:
    included:
      - examplegroup # Index "examplegroup" from GitLab
If you’re using the SaaS GitLab product hosted at gitlab.com instead of a self-hosted installation you’ll need to follow the above steps to provide an inclusion filter for at least one group you’d like to index. This is necessary to prevent the connector from attempting to index the entirety of the public SaaS GitLab deployment.
Configuring GitLab user mappings
If people are using their company emails in GitLab, the identity resolver cannot automatically map them to company user identities.
For this reason the GitLab configuration contains a user mapping table. For example, the entries:
'12345678':  user1@example.com
'87654321':  user2@example.com
Map two GitLab user IDs to the user’s username (i.e. email address) in the organization. The numerical GitLab ID can easily be obtained using the following URL in a browser where USERNAME is replaced with the GitLab username. The ID is in the id field of the JSON response. On the command this can be obtained by using curl and jq as follows (using the user ID USERNAME in this example):
curl 'https://gitlab.company.com/api/v4/users?access_token=ACCESS_TOKEN&search=USERNAME' | jq '.[0].id'
Adding an entry like this for every user will allow Atolio to link the GitLab user IDs to other sources.
7 - Google Connector
Index documents, sheets, slides, files, sites and email across your Google Workspace (Google Drive, Gmail and Google Sites).
The Google connector enables the indexing of:
- Documents, Sheets, Slides, and other Files in Google Drive
- Email in Gmail
- Pages in Google Sites
- Users and Groups as metadata in your Google Workspace to enable user mapping / permissions
Content and updates are streamed as changes are detected and processed in your Google Workspace.
Terraform will need a service account to make changes to your GCP project. We will grant it permissions which will essentially allow it to create, read, and delete all project resources. As such, you should keep the credentials for this account safe and not reuse them. The Terraform scripts create a much more restricted service account for normal operation.
- Visit the IAM Service Accounts page https://console.cloud.google.com/iam-admin/serviceaccounts and select the project created previously to set up the Terraform service account.
- Click CREATE SERVICE ACCOUNT
- Choose a name. While it can be anything, the name “Atolio Terraform” is recommended.
- Select CREATE AND CONTINUE.
- Grant the following roles: “Owner”, “Security Center Admin”, “Project IAM Admin” (without conditions).
- Click DONE. Skip step 5, you will not need to grant other users access to this service account.
Now the service account is created we can create API keys:
- Navigate to https://console.cloud.google.com/iam-admin/serviceaccounts and select the project created previously.
- Click the service user that was created in the previous step.
- Select the KEYS tab click the ADD KEY pull-down menu
- Select Create new key and use JSON for key type. Click CREATE.
This will create another JSON file with the API key and related information. This file will be needed by your Deployment Engineer (in their deploy/terraform directory).
In order for Terraform to programmatically make modifications, you need to manually enable the Google Cloud Resource Manager API.
- Navigate to https://console.cloud.google.com/apis/library
- Search for “Cloud Resource Manager API”
- Select “Cloud Resource Manager API”. Click ENABLE.
The project will use additional APIs, but now that this API is available to Terraform, the Atolio deployment scripts will use Terraform to enable those APIs automatically.
Grant Service Account Permissions
The Google Workspace domain needs to grant permission to the integration’s default service account to perform operations. Unfortunately Terraform can’t automate this, so it has to be performed manually.
Your Deployment Engineer will need to make note of the unique ID for the default App Engine service account and the list of scopes. Be aware that this ID is of the default service account, typically named App Engine default service account. It is not the Service Account you’ve previously created.
And the list of scopes are:
https://www.googleapis.com/auth/gmail.readonly,https://www.googleapis.com/auth/admin.directory.user.readonly,https://www.googleapis.com/auth/admin.directory.group.readonly,https://www.googleapis.com/auth/calendar.readonly,https://www.googleapis.com/auth/drive.readonly,https://www.googleapis.com/auth/admin.directory.domain.readonly,https://www.googleapis.com/auth/drive.activity.readonly
We now need to set up Domain-wide Delegation:
- Navigate to the Google Admin console: https://admin.google.com/ac/owl. An account with admin access is required.
- Scroll down and click “MANAGE DOMAIN WIDE DELEGATION”.
- Click Add new and enter your service account client ID (obtained from your Deployment Engineer in the previous step). No overwrite.
- Enter the value for
google_service_account_id as obtained from your Deployment Engineer. - Enter the list of scopes as listed above (as a single comma-delimited string).
- Click AUTHORIZE.
Now Atolio is authorized to retrieve Google Workspace data.
7.1 - Gmail Connector Setup
Provide necessary API permissions to index Gmail content.
Installing the Gmail Connector
Note:
For this step, your deployment engineer will be required.
The Gmail and Google Drive connectors depend on a shared Google Workspace configuration section. Google Workspace requires three properties to be set during configuration:
ProjectID must reference the project created in GCP. The id, not the name, must be specified.ServiceUser is currently a reference to a super user or administrator within your organization. For example, the primary IT email. This may change in the future.ServiceAccountKey is the base64-encoded string as obtained during initial install of the Google source.
To obtain the service account key, your deployment engineer will run the following Terraform command:
terraform output -raw google_connector_service_account_key
And optionally:
Domains is a comma-delimited list of domains applicable to this deployment.Parallelism is an optimization to increase the concurrency with respect to indexing Google data. Default is 32, so if set, should be higher than this value.
Once the Google source is configured, the Google Drive and Gmail sources can be configured with the same values.
7.2 - Google Drive Connector Setup
Provide necessary API permissions to index Google Drive contents.
Installing the Google Drive Connector
Note:
For this step, your deployment engineer will be required.
The Gmail and Google Drive connectors depend on a shared Google Workspace configuration section. Google Workspace requires three properties to be set during configuration:
ProjectID must reference the project created in GCP. The id, not the name, must be specified.ServiceUser is currently a reference to a super user or administrator within your organization. For example, the primary IT email. This may change in the future.ServiceAccountKey is the base64-encoded string as obtained during initial install of the Google source.
To obtain the service account key, your deployment engineer will run the following Terraform command:
terraform output -raw google_connector_service_account_key
And optionally:
Domains is a comma-delimited list of domains applicable to this deployment.Parallelism is an optimization to increase the concurrency with respect to indexing Google data. Default is 32, so if set, should be higher than this value.
Once the Google source is configured, the Google Drive and Gmail sources can be configured with the same values.
7.3 - Google Sites Connector Setup
Provide necessary API permissions to index Google Sites.
Installing the Google Sites Connector
Note:
For this step, your deployment engineer will be required.
Prerequisites
Google Sites Connector requires you to enable Google Vault for your organization. Google Vault enrollment details are available in the official documentation
You will need a Service Account as described in Grant Service Account Permissions section. In addition to the scopes listed there, you must grant the following scopes to the Service Account:
- https://www.googleapis.com/auth/ediscovery
- https://www.googleapis.com/auth/devstorage.read_only
Vault API access must be manually enabled by the GCP project associated with the Service Account. This can be done via GCP API Console, by following the steps in the official documentation.
Configuration
Once the prerequisites above are completed, you need to configure the connector.
ServiceUser, ServiceAccountKey, and Domains are parts of the configuration similar to GMail/GDriveSiteUrls is a list of top-level Google Site URLs you want to index. e.g., https://sites.google.com/your-org/your-siteSiteConfigs is an optional map of site-specific configuration you want to setup.
For automatically updating Atolio with recent changes on your Google Site, provide an update frequency to your Deployment Engineer, e.g., every day, every hour, etc.
An example configuration would be as follows:
configuration:
  ...
  site-urls:
    - https://sites.google.com/your-org/your-site
  site-configs:
    https://sites.google.com/your-org/your-site
      # If you have a custom domain for your Google Site, specify it here.
      top-level-url: https://your-custom-domain.com/path

      # If you want to configure deeplinks for each page,
      # you can do it by providing a "page name" -> "URL suffix" map here.
      #
      # For a page titled "Home", the deeplink would be:
      # https://your-custom-domain.com/path/home
      page-name-to-url-suffix:
        Home: /home
        About: /about

      # If you have setup "Restricted" access for your site, specify it here.
      # Default is `false`.
      restricted: true
If you do not prefer to have a static configuration for deeplinks, you can also provide a “url path” on each Google Site page. Simply add a text in the form of urlpath:[/relative-path-to-your-page] in the body of each page, and Atolio will index the page with the user-provided deeplink.
8 - Linear Connector
Index teams, projects, issues, and comments in Linear.
The Linear connector indexes teams, projects, issues, and comments across your Linear workspace.
Note: Atolio currently uses an API key for this connector, but will support a published Integration in a future release.
Create the Linear API key & Webhooks
As an administrator:
- Navigate to Workspace Settings by selecting your tenant and choosing
Preferences. - Under
My Account, click on API.
To create an API key, complete the following steps:
3. Under Personal API keys, provide a Label in the text box, e.g. Atolio.
4. Click on Create new API key.
5. Copy the value of the key to securely share with your Deployment Engineer.
To create a Webhook, complete the following steps:
6. Under Webhooks, click on Create new webhook.
7. Provide a Label in the text box, e.g. Atolio.
8. For URL, specify the URL provided by your Deployment Engineer. It will be similar to the following with your chosen DNS name:
https://relay.search.example.com/connectors/linear/default/callback/linear- Note: if you have multiple Linear instances, please make sure to provide the correct instance name in the URL above (i.e.
default in the example).
- Under
Data change events, ensure the following are checked: - Copy the value of the
Signing secret to securely share with your Deployment Engineer. - Click on
Create webhook to finalize the creation of this webhook.
Provide Configuration
Once the API key and Webhook have been created, provide these configuration values to your Deployment Engineer:
UrlKey is the name of your Linear workspace.Token is the personal access token.WebhookSecret is the webhook secret.
9 - Microsoft Connectors
Integrate with Entra ID for user mappings. Index SharePoint sites and Teams channels.
The Microsoft connectors support:
- Entra ID - for resolving user mappings across apps as an Identity Provider
- SharePoint - for indexing sites, docs, spreadsheets, slides, and other files
- Teams - for indexing channels, chat, and messages
- OneDrive - for indexing docs, spreadsheets, slides, and other files
- Outlook - for indexing emails and calendar events
Security Best Practice: Separate App Registrations
We recommend creating separate App Registrations for each Microsoft source you plan to use. This follows the principle of least privilege and provides:
- Reduced attack surface - Each connector only has the minimum permissions required
- Better audit trails - Azure logs can isolate which application accessed which data
- Independent lifecycle management - Rotate certificates, disable connectors, or modify permissions without affecting other sources
- Granular admin consent - Security teams can approve smaller, focused permission requests
- Independent rate limits - Each App Registration has separate Microsoft Graph API rate limits, preventing sources from competing for shared quotas in large environments
Architecture Options
Choose the approach that best fits your organization’s security and scale requirements:
Option 1: Separate App Registration per Source (Recommended)
Create individual App Registrations for:
- Entra ID (if using as identity provider)
- SharePoint
- Teams
- OneDrive
- Outlook
Each registration gets only the permissions needed for that specific source.
Option 2: Single Shared App Registration (Evaluation Only)
Use one App Registration for all sources. This requires the superset of all permissions and is not recommended for production environments due to security and rate limiting concerns.
Prerequisites
Before configuring any Microsoft connector, ensure you have:
Azure Access Requirements
- Azure tenant with appropriate licensing (Microsoft 365 E1+ for SharePoint/OneDrive, Teams Premium for meeting transcripts)
- Global Administrator or Cloud Application Administrator role to:
- Create App Registrations
- Grant application permissions
- Provide admin consent
- Certificate for authentication - See Certificate Generation Guide below
Atolio Environment
- Active Atolio deployment - Contact your Atolio onboarding team if you need assistance
- Configuration values - You’ll collect these from Azure and provide them to your Atolio support contact
Certificate Generation
Microsoft Graph API requires certificate-based authentication. Choose one option:
Option 1: Self-Signed Certificate (OpenSSL)
# Generate private key and certificate
openssl req -x509 -newkey rsa:2048 -keyout atolio-key.pem -out atolio-cert.pem -days 365 -nodes

# Create PFX file (no password)
openssl pkcs12 -export -out atolio-cert.pfx -inkey atolio-key.pem -in atolio-cert.pem -passout pass:

# Create CER file for Azure upload
openssl x509 -outform der -in atolio-cert.pem -out atolio-cert.cer

# Get base64-encoded PFX for Atolio configuration
cat atolio-cert.pfx | base64
Option 2: Self-Signed Certificate (PowerShell/Windows)
# Generate certificate
$cert = New-SelfSignedCertificate -Subject "CN=Atolio" -CertStoreLocation "Cert:\CurrentUser\My" -KeyExportPolicy Exportable -KeySpec Signature

# Export CER file for Azure
Export-Certificate -Cert $cert -FilePath "atolio-cert.cer"

# Export PFX file for Atolio (replace 'password' with your preferred password)
Export-PfxCertificate -Cert $cert -FilePath "atolio-cert.pfx" -Password (ConvertTo-SecureString -String "password" -Force -AsPlainText)

# Get base64-encoded PFX
[Convert]::ToBase64String([IO.File]::ReadAllBytes("atolio-cert.pfx"))
Common Setup Steps
All Microsoft connectors require these foundational steps:
- Create App Registration - Follow Entra ID - Create New App Registration
- Upload Certificate - Add your
.cer file to the App Registration - Grant API Permissions - Add Application permissions (not Delegated) for each source:
- Admin Consent - Click “Grant admin consent” in the API permissions page
Configuration Values
Collect these values from Azure and provide them to your Atolio support contact:
ClientCert - Base64-encoded content of the .PFX file (from certificate generation step)ClientCertPassword - Certificate’s private key password (if you set one)TenantId - Directory (tenant) ID from the App Registration Overview pageClientId - Application (client) ID from the App Registration Overview page
Resource Filtering
All Microsoft connectors support filtering to limit indexing scope using YAML configuration in your connector settings:
resources:
  user:
    included:
      - arthur.dent@example.com
  group:
    excluded:
      - contractors@example.com
Common filter types include:
- User filters - Index content for specific user accounts
- Group filters - Index content accessible by specific Microsoft 365 groups
- LDAP group filters - Index content for members of specific Entra ID security/distribution groups (Outlook only)
- Site/Team filters - Index specific SharePoint sites or Teams
For detailed filtering options, see the individual connector documentation pages.
9.1 - OneDrive Connector Setup
Provide necessary API permissions to index OneDrive files.
Index OneDrive files by creating a dedicated App Registration with the appropriate permissions.
Setup Checklist
Before starting, ensure you have:
Required API Permissions
Step 1: Create App Registration
- Navigate to Azure Portal > App Registrations
- Click “New registration”
- Enter name:
Atolio OneDrive - Select “Accounts in this organizational directory only”
- Click “Register”
Step 2: Add API Permissions
⚠️ Important: Only add Application permissions, not Delegated permissions
- In your App Registration, click “API permissions” in the left menu
- Click “Add a permission”
- Select “Microsoft Graph”
- Click “Application permissions” (not Delegated permissions)
Add these Microsoft Graph permissions:
Identity & Directory Permissions (Required for ACL mapping)
Application.Read.AllGroup.Read.AllGroupMember.Read.AllUser.Read.AllDirectory.Read.All (optional - can omit with disable_full_permissions: true in configuration)
OneDrive Content Permissions
Files.Read.AllReports.Read.All (required for indexing progress display)
Step 3: Grant Admin Consent
- After adding all permissions, click “Grant admin consent for [your tenant name]” at the top of the API permissions page
- Confirm by clicking “Yes”
- Verify all permissions show “Granted for [your tenant name]” with green checkmarks
Step 4: Upload Certificate
- Click “Certificates & secrets” in the left menu
- Click “Upload certificate”
- Select your
.cer file (not the .pfx file) - Add description:
Atolio OneDrive Authentication - Click “Add”
Step 5: Collect Configuration Values
From the “Overview” page, copy:
- Application (client) ID
- Directory (tenant) ID
You’ll provide these along with your base64-encoded .pfx certificate to your Atolio support contact.
Resource Filtering
Limit indexing scope using resource filters. OneDrive supports multiple filter types:
User Filtering
Index OneDrive files for specific user accounts:
resources:
  user:
    included:
      - arthur.dent@example.com
      - ford.prefect@example.com
    excluded:
      - galactic-president@example.com
Group Filtering
Index OneDrive files accessible by Microsoft 365 groups:
resources:
  group:
    included:
      - engineering-group@example.com
    excluded:
      - contractors@example.com
Sample Configuration
Here’s a complete YAML configuration example for OneDrive:
connector: microsoft
source: onedrive
common:
  enabled: true
  identity-provider: false
  cron-spec: "10 */1 * * *"
secrets:
  client_cert:
    value: "<BASE64_ENCODED_PFX_CONTENT>"
  client_cert_password:
    value: "<CERTIFICATE_PASSWORD>"  # Optional if no password set
configuration:
  client-id: "<APPLICATION_CLIENT_ID>"
  tenant-id: "<DIRECTORY_TENANT_ID>"
  disable_full_permissions: false
  resources:
    user:
      included:
        - john.doe@contoso.com
        - jane.smith@contoso.com
    group:
      excluded:
        - contractors@contoso.com
Troubleshooting
| Error | Cause | Solution |
|---|
401 Unauthorized | Missing admin consent | Click “Grant admin consent” in API permissions |
403 Forbidden | Wrong permission type | Ensure you added Application permissions, not Delegated |
invalid_client | Certificate not found/expired | Verify certificate is uploaded and valid |
| OneDrive files not appearing | Missing Files.Read.All permission | Add permission and re-grant admin consent |
| User drives missing | User not in included list | Check user filtering configuration |
9.2 - Outlook Connector Setup
Provide necessary API permissions to index Outlook emails and calendar events.
Index Outlook emails and events by creating a dedicated App Registration with the appropriate permissions.
Setup Checklist
Before starting, ensure you have:
Required API Permissions
Step 1: Create App Registration
- Navigate to Azure Portal > App Registrations
- Click “New registration”
- Enter name:
Atolio Outlook - Select “Accounts in this organizational directory only”
- Click “Register”
Step 2: Add API Permissions
⚠️ Important: Only add Application permissions, not Delegated permissions
- In your App Registration, click “API permissions” in the left menu
- Click “Add a permission”
- Select “Microsoft Graph”
- Click “Application permissions” (not Delegated permissions)
Add these Microsoft Graph permissions:
Identity & Directory Permissions (Required for ACL mapping)
Application.Read.AllGroup.Read.AllGroupMember.Read.AllUser.Read.AllDirectory.Read.All (optional - can omit with disable_full_permissions: true in configuration)
Outlook Content Permissions
Mail.ReadCalendars.ReadMailboxSettings.ReadDomain.Read.All
Step 3: Grant Admin Consent
- After adding all permissions, click “Grant admin consent for [your tenant name]” at the top of the API permissions page
- Confirm by clicking “Yes”
- Verify all permissions show “Granted for [your tenant name]” with green checkmarks
Step 4: Upload Certificate
- Click “Certificates & secrets” in the left menu
- Click “Upload certificate”
- Select your
.cer file (not the .pfx file) - Add description:
Atolio Outlook Authentication - Click “Add”
Step 5: Collect Configuration Values
From the “Overview” page, copy:
- Application (client) ID
- Directory (tenant) ID
You’ll provide these along with your base64-encoded .pfx certificate to your Atolio support contact.
Resource Filtering
Limit indexing scope using resource filters. Outlook supports multiple filter types:
User Filtering
Index mailboxes for specific user accounts:
resources:
  user:
    included:
      - arthur.dent@example.com
      - ford.prefect@example.com
    excluded:
      - galactic-president@example.com
LDAP Group Filtering
Index mailboxes for members of Entra ID security/distribution groups:
resources:
  ldap:
    included:
      - f47ed439-7c7d-430d-aff3-0acecdec2cae  # Engineering Security Group (ObjectId)
LDAP Group Filter Notes:
- Accepts Entra ID group ObjectIds (GUIDs) or distinguished names
- Filters based on transitive group membership
- Only indexes mailboxes of group members
- Only a single LDAP group filter is supported at a time
- Use Azure AD PowerShell or Graph Explorer to find group ObjectIds
Manually Specify Email Address Domains
If email address domains of your organization are already listed in MS Graph API /domains query, you can skip this step.
For Atolio to identify contributors of Outlook resources correctly, a list of email address domains must be known. If users in your organization have email addresses like user1@example.com and user2@contoso.com, this list should consist of example.com, and contoso.com.
You can manually specify an email address domain list as part of your configuration in the following format:
known-domains:
  - example.com
  - contoso.com
Sample Configuration
Here’s a complete YAML configuration example for Outlook:
connector: microsoft
source: outlook
common:
  enabled: true
  identity-provider: false
  cron-spec: "20 */1 * * *"
secrets:
  client_cert:
    value: "<BASE64_ENCODED_PFX_CONTENT>"
  client_cert_password:
    value: "<CERTIFICATE_PASSWORD>"  # Optional if no password set
configuration:
  client-id: "<APPLICATION_CLIENT_ID>"
  tenant-id: "<DIRECTORY_TENANT_ID>"
  disable_full_permissions: false
  disable-attachments: true    # Set to false to index email attachments
  backfill-start-time: "2025-01-01T00:00:00Z"  # Index emails from this date
  known-domains:
    - contoso.com
    - example.com
  resources:
    user:
      included:
        - arthur.dent@example.com
        - ford.prefect@example.com
    ldap:
      included:
        - f47ed439-7c7d-430d-aff3-0acecdec2cae  # Atolio Users Group
Troubleshooting
| Error | Cause | Solution |
|---|
401 Unauthorized | Missing admin consent | Click “Grant admin consent” in API permissions |
403 Forbidden | Wrong permission type | Ensure you added Application permissions, not Delegated |
invalid_client | Certificate not found/expired | Verify certificate is uploaded and valid |
| Mailboxes not appearing | Missing mail permissions | Verify Mail.Read and Calendars.Read permissions |
| LDAP filtering not working | Invalid group ObjectId | Use Azure AD PowerShell to verify group ID |
| Contributor identification issues | Missing known-domains | Add all organization email domains to configuration |
9.3 - SharePoint Connector Setup
Provide necessary API permissions to index SharePoint sites.
Index SharePoint sites, pages, and files by creating a dedicated App Registration with the appropriate permissions.
Setup Checklist
Before starting, ensure you have:
Required API Permissions
Step 1: Create App Registration
- Navigate to Azure Portal > App Registrations
- Click “New registration”
- Enter name:
Atolio SharePoint - Select “Accounts in this organizational directory only”
- Click “Register”
Step 2: Add API Permissions
⚠️ Important: Only add Application permissions, not Delegated permissions
- In your App Registration, click “API permissions” in the left menu
- Click “Add a permission”
- Select “Microsoft Graph”
- Click “Application permissions” (not Delegated permissions)
Add these Microsoft Graph permissions:
Identity & Directory Permissions (Required for ACL mapping)
Application.Read.AllGroup.Read.AllGroupMember.Read.AllUser.Read.AllDirectory.Read.All (optional - can omit with disable_full_permissions: true in configuration)
SharePoint Content Permissions
Files.Read.AllSites.Read.All
Step 3: Grant Admin Consent
- After adding all permissions, click “Grant admin consent for [your tenant name]” at the top of the API permissions page
- Confirm by clicking “Yes”
- Verify all permissions show “Granted for [your tenant name]” with green checkmarks
Step 4: Upload Certificate
- Click “Certificates & secrets” in the left menu
- Click “Upload certificate”
- Select your
.cer file (not the .pfx file) - Add description:
Atolio SharePoint Authentication - Click “Add”
Step 5: Collect Configuration Values
From the “Overview” page, copy:
- Application (client) ID
- Directory (tenant) ID
You’ll provide these along with your base64-encoded .pfx certificate to your Atolio support contact.
SharePoint Site Groups & Associated Permissions
Many SharePoint sites are deployed without connecting to Microsoft Office 365 groups. Microsoft treats certain SharePoint configurations as unsupported unless managed through Office 365 groups. For Atolio to index correct permissions on non-O365 managed sites, the Sites.FullControl.All permission is required. Communication Sites commonly fall into this category. For more information on connecting sites to O365 groups, see Microsoft’s documentation.
Atolio can index these sites if Sites.FullControl.All permission is set on your App Registration. This is the least privileged permission available for read access to the SharePoint API. Atolio never writes back to the SharePoint API.
When configuring the connector for non-O365 group sites:
- Set
Sites.FullControl.All permissions on the App Registration, specifically within the SharePoint API. (see below screenshot) - Set
IndexSharePointPermissions configuration to true

All other configuration and certificates remain the same.
Resource Filtering
Limit indexing scope using resource filters. SharePoint supports site-specific filtering:
Site Filtering
Index specific SharePoint sites by URL:
resources:
  site:
    included:
      - https://contoso.sharepoint.com/sites/Engineering
      - https://contoso.sharepoint.com/sites/Marketing
    excluded:
      - https://contoso.sharepoint.com/sites/Confidential
Sample Configuration
Here’s a complete YAML configuration example for SharePoint:
connector: microsoft
source: sharepoint
common:
  enabled: true
  identity-provider: false
  cron-spec: "30 */1 * * *"
secrets:
  client_cert:
    value: "<BASE64_ENCODED_PFX_CONTENT>"
  client_cert_password:
    value: "<CERTIFICATE_PASSWORD>"  # Optional if no password set
configuration:
  client-id: "<APPLICATION_CLIENT_ID>"
  tenant-id: "<DIRECTORY_TENANT_ID>"
  disable_full_permissions: false
  index_sharepoint_permissions: true  # Required for non-O365 group sites
  resources:
    site:
      included:
        - https://contoso.sharepoint.com/sites/Engineering
        - https://contoso.sharepoint.com/sites/Marketing
Troubleshooting
| Error | Cause | Solution |
|---|
401 Unauthorized | Missing admin consent | Click “Grant admin consent” in API permissions |
403 Forbidden | Wrong permission type | Ensure you added Application permissions, not Delegated |
invalid_client | Certificate not found/expired | Verify certificate is uploaded and valid |
| Sites not appearing | Missing Sites.FullControl.All | Add SharePoint API permission for non-O365 group sites |
| Permission errors on specific sites | Site not connected to O365 group | Set index_sharepoint_permissions: true |
9.4 - Teams Connector Setup
Provide necessary API permissions to index Teams channels.
Index Teams channels, chat, messages, and meeting transcripts by creating a dedicated App Registration with the appropriate permissions.
Setup Checklist
Before starting, ensure you have:
Required API Permissions
Step 1: Create App Registration
- Navigate to Azure Portal > App Registrations
- Click “New registration”
- Enter name:
Atolio Teams - Select “Accounts in this organizational directory only”
- Click “Register”
Step 2: Add API Permissions
⚠️ Important: Only add Application permissions, not Delegated permissions
- In your App Registration, click “API permissions” in the left menu
- Click “Add a permission”
- Select “Microsoft Graph”
- Click “Application permissions” (not Delegated permissions)
Add these Microsoft Graph permissions:
Identity & Directory Permissions (Required for ACL mapping)
Application.Read.AllGroup.Read.AllGroupMember.Read.AllUser.Read.AllDirectory.Read.All (optional - can omit with disable_full_permissions: true in configuration)
Teams Content Permissions
Channel.ReadBasic.AllChannelMember.Read.AllChannelMessage.Read.AllChat.Read.AllChatMember.Read.AllChatMessage.Read.AllTeam.ReadBasic.AllTeamMember.Read.All
Teams Meeting Transcripts (Optional)
OnlineMeetings.Read.AllOnlineMeetingTranscript.Read.AllCalendars.ReadDomain.Read.All
Step 3: Grant Admin Consent
- After adding all permissions, click “Grant admin consent for [your tenant name]” at the top of the API permissions page
- Confirm by clicking “Yes”
- Verify all permissions show “Granted for [your tenant name]” with green checkmarks
Step 4: Upload Certificate
- Click “Certificates & secrets” in the left menu
- Click “Upload certificate”
- Select your
.cer file (not the .pfx file) - Add description:
Atolio Teams Authentication - Click “Add”
Step 5: Collect Configuration Values
From the “Overview” page, copy:
- Application (client) ID
- Directory (tenant) ID
You’ll provide these along with your base64-encoded .pfx certificate to your Atolio support contact. This link is beside the Add a permission link.
Application Access Policy for Teams Meeting Transcripts
In addition to Entra ID permissions above, you need to setup an application access policy for Atolio to access transcripts.
- Open PowerShell. Install the Microsoft Teams PS module:
Install-Module -Name MicrosoftTeams -Force -AllowClobber
- Connect to Teams module w/ an admin account on your shell. This will prompt a login page on your browser:
Import-Module MicrosoftTeamsConnect-MicrosoftTeams
- Create a new policy. Assuming the policy name is “Atolio-Transcript-Access-Policy”, and the previously registered application ID (client ID) is “some-app-id”, the shell command will be as follows:
New-CsApplicationAccessPolicy -Identity Atolio-Transcript-Access-Policy -AppIds "some-app-id" -Description "Access policy for teams transcripts"
- Associate users with the policy. You have two options:
- Option 1 - Grant tenant-wide access (recommended). This will allow Atolio to index transcripts owned by every user who does not have an application access policy assigned:
Grant-CsApplicationAccessPolicy -PolicyName Atolio-Transcript-Access-Policy -Global
- Option 2 - Grant user-specific access. This will allow Atolio to index transcripts owned by explicitly declared users only:
Grant-CsApplicationAccessPolicy -PolicyName Atolio-Transcript-Access-Policy -Identity "some-user-id"
More details about the policy setup can be found in the official documentation:
Resource Filtering
Limit indexing scope using resource filters. Teams supports team-specific filtering:
Team Filtering
Index specific Teams by name or ID:
resources:
  team:
    included:
      - 66e327b3-321a-4ebf-8e2c-34cebf134bf8 # Engineering Team ID
      - 0507654f-506d-4805-95d5-516bcaf1075c # Sales Team ID
    excluded:
      - b0b083d0-6288-45ce-8ecd-16960ba7b329 # HR Team ID
Sample Configuration
Here’s a complete YAML configuration example for Teams:
connector: microsoft
source: teams
common:
  enabled: true
  identity-provider: false
  cron-spec: "40 */1 * * *"
secrets:
  client_cert:
    value: "<BASE64_ENCODED_PFX_CONTENT>"
  client_cert_password:
    value: "<CERTIFICATE_PASSWORD>"  # Optional if no password set
configuration:
  client-id: "<APPLICATION_CLIENT_ID>"
  tenant-id: "<DIRECTORY_TENANT_ID>"
  disable_full_permissions: false
  enable-transcripts: true  # Enable meeting transcript indexing
  skip-chats: false        # Set to true to skip private chats
  resources:
    team:
      included:
        - 66e327b3-321a-4ebf-8e2c-34cebf134bf8 # Engineering Team ID
        - 0507654f-506d-4805-95d5-516bcaf1075c # Marketing Team ID
Troubleshooting
| Error | Cause | Solution |
|---|
401 Unauthorized | Missing admin consent | Click “Grant admin consent” in API permissions |
403 Forbidden | Wrong permission type | Ensure you added Application permissions, not Delegated |
invalid_client | Certificate not found/expired | Verify certificate is uploaded and valid |
| Teams not appearing | Missing team permissions | Verify all Teams permissions are granted |
| Transcripts missing | Application access policy not set | Follow PowerShell policy setup steps above |
| Private chats missing | Chat.Read.All permission missing | Add permission and re-grant admin consent |
Limitations
- Only first 1000 replies to a channel post will be indexed, due to limitations with the Microsoft API.
10 - Notion Connector
Index databases, pages, and comments in Notion.
The Notion connector indexes databases, pages, and comments across your Notion workspace.
Create the Notion integration
As an administrator, you can either follow the steps below or navigate directly to My Integrations:
- Click on
Settings & members. - Under
Workspace, click on Connections. - Click the link for
Develop or manage integrations.
Create a new Internal integration by following the steps below:
- Choose the associated workspace and give it an appropriate name, e.g. Atolio.
- (Optional) Use the Atolio logo here, if needed.
- Under
Secrets, copy the Internal Integration Secret to share with your Deployment Engineer. - Under
Capabilities:
- Only “Read content” and “Read comments” are necessary. The other permissions can be removed.
- Ensure that “Read user information including email addresses” is enabled.
- Click
Save changes.
Once the integration has been created, provide the secret copied above to your Deployment Engineer for configuration in your Atolio deployment.
11 - Okta Connector
Provides app-user mappings stored in Okta.
The Okta connector provides identity mappings for each user based on the apps that they use.
Note:
As part of Atolio Configuration, this connector should be selected as Identity Provider if it used to resolve app-user mappings.
Creating an API Token
You may have already performed some of the necessary steps in Configuring Authentication. Atolio also requires an API token created using these these instructions or by simply going to https://example.okta.com/admin/access/api/tokens.
Provide the following configuration values to your Deployment Engineer in order to complete these steps:
Hostname, the host name for your Okta instance (e.g. example.okta.com)Token, the API Token created above
12 - Salesforce Connector
Index top level resources such as Accounts, Contacts, Cases, Opportunities, Leads by installing a Connected App.
The Salesforce connector enables the indexing of Salesforce objects, such as Accounts and Opportunities, using the Salesforce REST API by creating a Connected App in your Salesforce instance.
Setup Connected App
Note:
The setup assumes that you are using the lightning experience of Salesforce.
As a best practice, we recommend creating a new user account or identifying an existing user account to be used for integrations. The profile for this user account will be given access to the Connected App in a later step.
- As an administrator, navigate to Setup.
- Under “Platform Tools”, go to “Apps” -> “App Manager”.
- Create a “New Connected App”.
- Choose a
Connected App Name and API Name, e.g. Atolio. - Choose an email for
Contact Email. - (Optional) For
Logo Image URL and/or Icon URL, you can use the Atolio logo here.
- Under API (Enable OAuth Settings), select
Enable OAuth Settings.
- For
Callback URL, enter a valid URL (e.g. https:/) - Atolio does not use this login flow for authentication. - For
Selected OAuth Scopes, add the “Manage user data via APIs (api)” scope. - Click the
Enable Client Credentials Flow and select OK on the prompt below.

- Click “Save”, then “Continue” to create the Connected App.
- When your Connected App has been provisioned, go back to “App Manager” and choose “Manage” from the actions drop-down for your Atolio connected app.
- Click on “Edit Policies”.
- Under “OAuth Policies”, for
Permitted Users select the “Admin approved users are pre-authorized” option. - Under “Client Credentials Flow”, set the
Run As to the desired user mentioned above.

Next, you will add the “Connected App Access” to the profile of the user you selected above.
- From Setup, navigate to “Users” -> “Users” and find your desired integration user. Click on their “Profile” to open the Profile page.
- Click “Edit”, then click the checkbox to enable your new Connected App for this user profile.
- Save those changes.
Provide Configuration
To obtain the necessary client credentials:
- Go back to “App Manager” and choose “View” from the actions drop-down for your Atolio connected app.
- Under “API (Enable OAuth Settings)”, click the “Manage Consumer Details” button for the “Consumer Key and Secret”.
- Copy the “Consumer Key” and “Consumer Secret” to be shared with your Deployment Engineer.
Provide the following values to your Deployment Engineer for them to configure in Atolio:
base_url is the URL of your Salesforce tenant, e.g. https://yourcompany.my.salesforce.com.client_id is the “Consumer Key” of the connected app you created.client_secret is the “Consumer Secret” of the connected app you created.
Streaming Configuration
To periodically sync updates in Salesforce to the Atolio index, we need to set the cron-spec. The recommended value is (*/10 * * * *). This would fetch updates from Salesforce every 10 minutes. We also need to set complete_backfill_frequency. This, alongside the cron-spec, controls how often the connector performs a complete backfill of the data (to capture ACL changes). For example, setting a value of 24 would mean that every 24th call to backfill would be a complete fill. This combined with a cron-spec of every 10 minutes, a complete backfill would happen every 4 hours. The recommended value is 48 so a complete backfill happens every 8 hours. This value can be tweaked to reduce the number of API calls. Generally, we want to use a higher value for larger datasets so the connector performs a complete backfill less frequently.
13 - ServiceNow Connector
Search across your ITSM tasks (incidents, service requests, etc.) and knowledge base articles in ServiceNow.
The ServiceNow connector will index:
- IT Service Management (ITSM) tasks - such as incidents, service requests, problems - including work notes and comments.
- Knowledge bases (KBs) and KB articles.
The ServiceNow connector supports all releases from ServiceNow San Diego to the latest.
Note:
If you need support for additional modules (e.g. Security Operations) with fields that aren’t indexed in the base tasks, contact your Atolio support team.
Install ServiceNow Update Set
The Atolio ServiceNow plug-in is available as an update set (XML file). The update set will be provided by your Deployment Engineer (from the Atolio GitHub repository) or your Atolio support team. From ServiceNow documentation, follow the steps below to Commit an update set.
- Elevate privileges to the
security_admin role:

- Navigate to
System Update Sets > Retrieved Update Sets. - Click the link to
Import Update Set from XML. Upload the XML file provided previously. - The application is now available as a retrieved update set with state Loaded. Click on
Atolio Connector to open the update set. - If necessary, skip or accept updates to resolve any problems.
- Click
Commit Update Set to install the application.
Note:
You can view the Commit log by navigating to System Update Sets > Update log and filtering to the Atolio Connector Update set.
Setup Application Credentials
First, create an application user by:
- Navigating to
System Security > Users and Groups > Users. - For
User ID, choose an appropriate name, e.g. atolio_connector. Click Submit. - In the new user record that you just created:
- Under
Roles, click Edit... and add x_penti_atolio.atolio_connector to the Roles List before clicking Save. - Click
Set Password to generate a password for this application user.
Next, enable the connector API by:
- Under the
Atolio Connector application, navigate to Integration - Atolio Connector > Administration > Properties. - If necessary, enable the connector’s API and integration with ServiceNow Knowledge Management.

Provide Configuration
Provide the following values to your Deployment Engineer for them to configure in Atolio:
Instance URL is the URL of your ServiceNow tenant.Username is the User ID of the application user you created, e.g. atolio_connector.Password is the password of the application user you created.
14 - Slack Connector
Index public channels, private channels, and threads in Slack where the Atolio bot is present.
The Slack connector indexes messages across public channels, private channels, and threads. It will only index messages where the Atolio bot has been invited.
Choose a Change Notification Mechanism
For Atolio to get notified of changes happening on Slack in real-time, there are 2 options: “HTTP mode”, and “socket mode”. A detailed comparison of these options is available here.
If having a webhook is not ideal for your organization, you can opt in for socket mode.
Create Slack App
In order to target your specific Atolio deployment, the Slack connector for Atolio requires a custom Slack app created from a manifest.
First, create the Slack app according the following instructions:
- In the Slack app dashboard (https://api.slack.com/apps), click on “Create New App”.
- Select “From an app manifest” when prompted.
- Select the workspace where the app should be installed.
- Select the “YAML” option, and provide the app manifest based on your preferred change notification mechanism:
- Manifest w/ “HTTP mode”:
https://relay.search.example.com/connectors/slack/default/install/manifest.yml?socketMode=false - Manifest w/ “socket mode”:
https://relay.search.example.com/connectors/slack/default/install/manifest.yml?socketMode=true
- Click on “Create”. Once the app is created, open the “Basic Information” page of your new app - it can be accessed from the Slack app dashboard (https://api.slack.com/apps).
- Locate the “App Credentials” heading and store the client ID, client secret, and signing secret in a safe place. These will be used to configure Slack shortly.
- (For “socket mode” only) Generate an “app-level token” w/
connections:write scope (screenshot below). Store the value in a safe place. - (Optional) To provide an app icon, locate the “Display Information” heading and upload the app icon provided here.
Note: it may be required to distribute the app. This can be done by clicking Manage Distribution in the Slack app dashboard.

Provide Configuration
Once the Slack app has been created, provide these configuration values to your Deployment Engineer:
DefaultTeamID is the Slack team ID for your workspace (e.g. T012ABCDEG3)ClientId, ClientSecret, and SigningSecret are the secrets obtained in the previous step. If you’ve opted in to use “socket mode”, the list should include an AppLevelToken as well.Token is a secret which will be populated by the next step. You may leave this blank.ConversationTypes are the types of conversations being indexed by the Atolio Slack Bot. If empty, this defaults to public_channel,private_channel,mpim
Once configured, you will finalize the installation of the Slack connector by visiting the following URL (make sure to use your own DNS name for the host part of the URL and include the correct instance name): https://relay.search.example.com/connectors/slack/default/install/setup. Also make sure the Atolio Web application is authenticated (using your SSO provider) before navigating to this URL to avoid an authentication error. The URL https://relay.search.example.com/install/connectors/slack/default/install/oauth/callback must be listed as a Redirect URLin the Slack app manifest. For example, with Okta this was done as part of Okta - Create OAuth Client.
In order for Slack conversations to be indexed by the Atolio Slack Bot, the bot needs to be added to the conversation. By default, this is done manually, but the bot can also be configured to auto-join public channels through configuration. If the bot is added to a channel which is later filtered out by configuration, auto-leave can be configured similarly.
The Slack Team ID can for instance be copied from the URL after logging into your company’s Slack Web app. For instance navigate to https://app.slack.com/ and note down the team ID in the URL that you get redirected to (e.g. T012ABCDEG3 in https://app.slack.com/client/T012ABCDEG3/.../...).
Index Private Content
To enable the indexing of private content such as direct messages (DMs) and private channels, without manually adding the bot to the respective conversation, the following steps must be taken:
- Set
slack-auth feature flag on your Atolio deployment - Set
EnablePrivateContent flag on Slack connector configuration
Afterwards, each Atolio user will be prompted with further instructions when they login to Atolio.

15 - SolarWinds Service Desk Connector
Index content on your SolarWinds Service Desk instance.
SolarWinds Service Desk (SWSD) connector enables the indexing of Incidents, Service Catalog, Problems, Solutions, Releases and Changes on your SWSD instance.
Prerequisites
The following configuration should be set on your SWSD instance, by an admin user, before configuring the SWSD connector.
- Create a new admin user:
- Go to Setup -> Users & Groups -> Users.
- Create a new user with a descriptive name, such as “Atolio Admin User”. Make sure the user is given “Admin” role.
- Activate the newly created user through the link sent via email.
- Altough you can use an existing admin user, creating a new user solely for the purpose of Atolio integration is a best practice.
- Generate JWT:
- Login as “Atolio Admin User”.
- Go to Setup -> Users & Groups -> Users. From the user table, click on “Atolio Admin User” to open the details page.
- From the “Actions” menu, select “Generate JSON Web Token” item to generate an API token. Provide the token value to your Deployment Engineer.
Provide Configuration
Provide the following configuration to your Deployment Engineer:
- Your SWSD domain, e.g.,
company.samanage.com - JWT of “Atolio Admin User”
- A full screenshot of Setup -> Account -> Roles & Permissions page. This is needed by your Deployment Engineer to configure the connector with respect to your permission settings.

Optionally, you can provide a backfill configuration, as follows:
# Filter data to be backfilled.
# If not provided, defaults to 1 year.
backfill-start-time: "2024-01-01T00:00:00Z" # Filter out data not updated since 2023.

# Specify when to create "checkpoints".
# If not provided, defaults to 1 year.
backfill-step-duration: 30 # Create a checkpoint after 30 days of data is backfilled.
16 - Staffbase Connector
Index resources such as Users, Campaigns, Posts, and Comments from your Staffbase platform.
The Staffbase connector enables indexing of various resources from your Staffbase platform, including Users, Campaigns, Posts, and Comments. This integration allows you to search and access Staffbase content directly through Atolio.
Set Up Administrator API Key and Retrieve Base URL
To set up the Staffbase connector, you’ll need to create an API key with administrator privileges. Follow these steps:
Log in to your Staffbase account as an administrator.
Navigate to the Admin Panel:
a. Click your user profile at the top right, then click ‘Studio’ in the drop-down menu.

b. Click the gear icon at the top right corner.

c. In the new page, you will see a column on the left. Click the ‘API Access’ tab.

Click the “Create New API Key” button.
Provide a descriptive name for the key, such as “Atolio Connector”.
Under “Access”, select “Read-only” to ensure full access to all resources.
Click “Create”.
Copy and securely store the generated API key. Note that you won’t be able to view this key again, so make sure to save it in a secure location.
On the same page, you’ll also see the base URL for your instance:

Provide Configuration
After creating the API key, provide the following information to your Deployment Engineer:
API Key: The administrator API key you just generated.Staffbase Instance URL: The URL of your Staffbase instance (e.g., https://yourcompany.staffbase.com).
17 - Web Connector
Index internal or external websites by crawling HTML pages and content.
The Web connector enables the indexing of HTML web pages.
Enable Access
The Web connector indexes unauthenticated web page content which can be accessed from your Atolio deployment.
First, determine where your website is hosted. The Web connector can crawl HTML content by either:
- Navigating URLs from a configured
baseURL. - Browsing an Amazon S3 bucket from a configured
url.
In order to ensure that the content is accessible in your Atolio deployment, ensure that your Deployment Engineer is aware of the necessary network or AWS permissions as part of the infrastructure deployment.
Note:
You may also need to ensure that your HTML content is server-side rendered (SSR) in order to index the complete website content.
(Optional) Provide Filters
Additional filters can be configured by your Deployment Engineer in order to:
- Include or exclude pages, e.g. particular URLs that match a given regex.
- Remove extraneous content, e.g. table of contents.
18 - Zendesk Connector
Index tickets and help center articles on your Zendesk instance.
Zendesk connector enables the indexing of tickets, and help center articles.
Prerequisites
The following configuration should be set on your Zendesk instance, by the account owner or an admin user, before configuring the Zendesk connector.
- Go to Zendesk admin panel
https://{your-zendesk-subdomain}.zendesk.com/admin/apps-integrations/apis/zendesk-api/settings
- Enable “API access”
- If you don’t see such an option, it means it’s already enabled.
- Enable “Token access”
- Create a new API token
- If you already have an API token other integrations, it’s still advised to create a new one for the Zendesk connector, and provide a descriptive name such as
atolio-connector-token. Note the token value since you cannot retrieve it after its creation. The token will be used to configure the connector.
- Create a new admin user
- If you already have an admin user for other integrations, it’s still advised to create a new admin user for the Zendesk connector, and provide a descriptive username such as
atolio-connector-admin-user@<your-org-domain>. The username will be used to configure the connector.
After the configuration, your API settings page should look like the following:

Provide Configuration
Provide the following configuration and answers to your Deployment Engineer:
- Your Zendesk subdomain
- API token, ideally the one you newly created under the name
atolio-connector-token - Admin user, ideally the one you newly created under the name
atolio-connector-admin-user@<your-org-domain> - Whether you want “Help Center” content to be indexed or not
- “Help Center” is an optional feature of Zendesk for hosting user-generated content (e.g., articles). If you use this feature and want your Help Center content to be indexed, mention this to your Deployment Engineer for them to configure it appropriately.
- If you’re not sure if your organization uses “Help Center” functionality, try visiting
https://{your-zendesk-subdomain}.zendesk.com/knowledge. A 404 error means your org is not using it.
Deployment engineer will also generate a “webhook secret”, and add it to the configuration. Please do not alter the configuration of any “webhook” or “trigger” starting with the word lumen. These are configured by the connector automatically, to index content changes in real-time.
Content Filtering
Atolio supports the ability to avoid certain content from being indexed at all. You can provide inclusions or exclusions with respect to each resource type.
- Users can be filtered w.r.t. their emails.
- Groups can be filtered w.r.t. their names.
- Organizations can be filtered w.r.t. their names.
- Tickets can be filtered w.r.t. their statuses (e.g., “open”, “closed”)
For Help center content:
- User Segments can be filtered w.r.t. their names.
- Articles can be filtered w.r.t. their section IDs.
- Section ID is a number that can be identified by executing the following command:
curl -L -u "{admin-user}/token:{admin-token}" https://{zendesk-subdomain}.zendesk.com/api/v2/help_center/articles/{article-id}.json | jq ".article.section_id"- Replace
{admin-user}, {admin-token}, {zendesk-subdomain}, and {article-id} values appropriately.
An example of inclusions/exclusions file would be as follows:
resources:
    user:
        excluded:
            - super_secret_user@example.com
    group:
        included:
            - A group name
            - Another group name
    organization:
        included:
            - An organization name
    user_segment:
        included:
            - A segment name
    ticket:
        excluded:
            - closed  # ticket status
    article:
        excluded:
            - "12345" # section id
If you need content filtering, provide the inclusions & exclusions similar to the file above to your Deployment Engineer.
19 - Zulip Connector
Index streams, topics, and messages in Zulip.
The Zulip connector indexes content from your Zulip organization using Zulip API credentials.
Atolio recommends using a dedicated Zulip bot for this connector rather than a personal user account.
Create Zulip credentials
Create credentials for either:
- a generic bot (recommended), or
- a dedicated service user.
You can retrieve Zulip API credentials using Zulip’s API key documentation: https://zulip.com/api/api-keys.
When creating the account used by Atolio:
- Use a dedicated bot or service account such as
atolio-bot or atolio-export-bot. - Record the account email address.
- Record the account API key.
- Record your Zulip organization URL (for example,
https://example.zulipchat.com).
Visibility and access
The Zulip connector can only index content visible to the configured bot or user:
- Public streams are indexed.
- Private streams are indexed only if the configured bot or user has been added to them.
- Private messages (DMs) are not indexed by default but can be enabled per-user (see Index Private Messages below).
Because of this, Atolio recommends using a dedicated generic bot with the appropriate stream access.
Provide Configuration
Provide the following values to your Deployment Engineer:
Domain: your Zulip organization URL (for example, https://example.zulipchat.com)Email: the email address of the Zulip bot or service userToken: the Zulip API key for that bot or user
Content Filtering
The Zulip connector supports filtering at the topic resource level.
Topics can be included or excluded using the format:
resources:
  topic:
    excluded:
      - engineering/Incident review
Each entry should be specified as:
For example:
resources:
  topic:
    excluded:
      - eng-general/Search Results Feedback (query)
If you need topic-level filtering, provide the inclusions or exclusions to your Deployment Engineer as part of the connector configuration.
Index Private Messages
By default, the Zulip connector does not index private messages (DMs). To enable DM indexing, each user who wants their private messages indexed must provide a personal Zulip API key.
Unlike Slack, Zulip does not currently support an OAuth-based authentication flow for this purpose. Each user must retrieve their API key manually and share it securely with their Atolio deployment administrator.
Retrieve your Zulip API key
Each user should follow these steps:
- In Zulip, open the Settings menu (gear icon in the top right).
- Navigate to Personal Settings → Account & privacy.
- Click Manage your API key at the bottom of the page. Your API key will be displayed — copy it.
Warning: Your Zulip API key grants full access to your Zulip account. Share it only through a secure channel (for example, a password manager or encrypted message). Do not share it over Zulip, Slack, email, or other unencrypted channels.
- Share the API key securely with your Atolio deployment administrator.
Once user API keys have been collected, provide them to your Deployment Engineer. They are stored in the connector configuration as a user_tokens secret, mapping each user’s Zulip email address to their API key:
secrets:
  user_tokens:
    value: |
      "alice@example.com": "abc123XXXX"
      "bob@example.com": "def456XXXX"
After the configuration is updated, private messages for those users will be indexed on the next sync.