Architecture
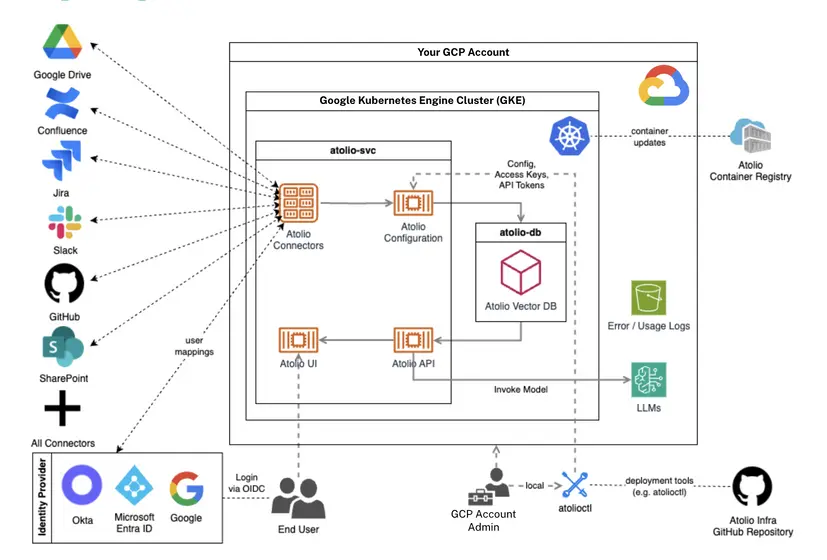
Deployment Prerequisites
Before getting started, Atolio needs to have done the following on your behalf:
- Add your Deployment Engineer as a collaborator to the Atolio
terraform-lumenGitHub repository, which contains the Terraform used to grant Atolio support access to your GCP project - Add your Deployment Engineer as a collaborator to the Atolio GitHub repository (lumen-infra), which contains:
- Deployment documentation
- Terraform for the Atolio stack infrastructure
- Configuration files for Atolio services
- Maintenance scripts
- Ensure your GCP project has sufficient quota for the required resources, particularly Compute Engine API and Google Kubernetes Engine API. See Hardware Requirements for the full list of recommended quotas.
Access to the Atolio Client Container Registry (for pulling Atolio container images) is granted later in the process, once your deployment has created the service accounts that need it. See Grant container registry access.
The following deployment prerequisites will help streamline your deployment process.
Determine GCP Project
We recommend you create a new GCP project to host Atolio, as this will help keep your Atolio deployment and other resources separate from your production environment. When the project is available, share the GCP project ID and number with your Atolio support team.
Please give the project a distinct ID that clearly identifies your company, for example acmecorp-atolio or acmecorp-atolio-prod. The project ID is carried into the names of every service account the deployment creates, such as acmecorp-atolio-support@acmecorp-atolio.iam.gserviceaccount.com, and those service accounts are granted access to shared Atolio infrastructure alongside those of every other customer.
A generic project ID such as atolio or search gives us very little to go on when we need to work out which identity belongs to which customer. Naming the project after your company keeps that unambiguous and makes support and troubleshooting considerably faster.
Determine Deployment Model
We offer both Atolio managed and customer managed deployment models for you to choose from. Please review the comparison and requirements for each approach on our Deployment Model Overview page and inform your Atolio support team which method you’d like to use for your deployment.
Grant Atolio Support Access
Atolio’s deployment support team needs scoped access to your GCP project in order to deploy and support the Atolio stack. This access is granted by a standalone Terraform configuration in the terraform-lumen repository, which creates an Atolio Deployment Support custom IAM role and a dedicated support service account in your project. Atolio engineers impersonate that service account, so they are never granted standing access to your project as users.
Run this step before the deployment call, regardless of whether you have chosen the Atolio managed or customer managed deployment model.
Clone the
terraform-lumenrepository:git clone git@github.com:atolio/terraform-lumen.gitCreate a
terraform.tfvarsfile in thesupport-onlydirectory describing your project and deployment:cd terraform-lumen/examples/gcp/support-onlyproject_id = "your-gcp-project-id" deployment_name = "acmecorp" region = "us-central1"Use the same
deployment_nameyou intend to use for the rest of the deployment. Typically this is your company name, with an optional suffix if you’re specifying an environment (e.g.acmecorporacmecorp-qa).Using the Google Workspace Connector?If your deployment will index Google Workspace (Gmail, Google Drive, Google Calendar), you must also set
enable_google_connector_support = trueinterraform.tfvars:enable_google_connector_support = trueThis adds the
iam.serviceAccountKeys.*andpubsub.*permissions that the Google connector requires. If you’re not deploying the Google Workspace connector, leave this setting out entirely.Apply the configuration against the GCP project you’d like Atolio to deploy into. Terraform picks up
terraform.tfvarsautomatically:terraform init terraform applyTerraform will display the exact permissions included in the custom role in the plan output before you approve the apply.
Provide the resulting outputs to your Atolio support team:
terraform outputatolio_support_service_account_email = "acmecorp-atolio-support@your-gcp-project-id.iam.gserviceaccount.com" atolio_support_custom_role_id = "projects/your-gcp-project-id/roles/acmecorp_deployment_support" atolio_support_customer_project_id = "your-gcp-project-id" atolio_support_customer_project_number = "123456789012" atolio_support_customer_deployment_name = "acmecorp" atolio_support_customer_deployment_region = "us-central1"The support service account email is the value you’ll need most often in the remaining steps.
Determine Atolio DNS Name
Before the deployment call, you may want to decide on your desired Atolio web address. A GCP Cloud DNS zone will be created in the GCP project used for hosting the Atolio stack (e.g. search.example.com.): this will be the DNS name (without the trailing dot) for the Atolio web application (e.g. https://search.example.com).
This Cloud DNS zone allows the deployment control plane (i.e. the External DNS controller) to add records to link host names (e.g. search.example.com, feed.search.example.comand relay.search.example.com) to the Ingress controller used for the deployment.
For the remainder of this document, we will use https://search.example.com in the examples, but it is expected for you to replace with your own DNS name.
Setup Authentication
Atolio supports single sign-on (SSO) authentication through Okta, Microsoft Entra ID, and Google using the OpenID Connect (OIDC) protocol.
Refer to Configuring Authentication for more details on the steps to complete in your desired SSO provider in order to obtain the necessary OIDC configuration values.
Setup Local Environment
Finally, if an engineer from your team will be performing the deployment, ensure they have the following utilities installed:
- Setup Terraform on your local machine as described on the HashiCorp docs site - we require v1.6.0 at a minimum.
- Install the Google Cloud SDK
- Install kubectl
- Install Helm
- Install atolioctl
Provide Deployment Engineer with Configuration
At this point if you’re proceeding with an Atolio managed deployment you’ll need to provide the information from these prerequisite steps to your Atolio deployment support team. Otherwise please ensure the information is provided to the engineer from your organization who will be performing the deployment with Atolio’s support.
To recap, provide these details:
- GCP project ID and number
- Atolio support service account email and the deployment name and region you used
- Atolio DNS name
- OIDC Configuration
If you’re opting to have Atolio manage the deployment you can disregard the remainder of this documentation as these steps will be performed by your Atolio deployment engineer. Otherwise be sure to share this documentation with the engineer from your organization that will be performing the deployment so they can familarize theirself with the steps required.
Create Cloud Infrastructure
The Terraform configuration requires an external (Google Cloud Storage) bucket to store state. A script is available to automate the whole process (including running Terraform). Before running the script, create a config.hcl file based on the provided config.hcl.template:
cd deploy/terraform/gcp
cp ./config.hcl.template config.hcl
Update the copied file with appropriate values. At a minimum, it should specify the zone you’re deploying to:
// Core Configuration
zone = "us-central1-f"
Atolio Support Access
The Atolio support role and service account were already created by the support-only configuration in terraform-lumen, so the equivalent resources in this configuration need to be disabled. If you leave them enabled the custom role ID collides and the apply fails. Point the configuration at the support service account that step produced:
# Support role/group binding is created by terraform-lumen's support-only
# configuration, not here.
atolio_support_enabled = false
# Support service account created by terraform-lumen's gcp/atolio-support module.
atolio_support_service_account_email = "acmecorp-atolio-support@your-gcp-project-id.iam.gserviceaccount.com"
Atolio Domain Name
Update the copied file with subdomain you will use for your Atolio deployment values:
# Domain name for Atolio stack (same as hosted zone name without trailing ".")
lumen_domain_name = "search.example.com"
Application Helm Value Options
Next copy the Helm template and update the values as directed.
cp ./templates/values-lumen-admin.yaml values-lumen.yaml
cp ./templates/values-vespa-admin.yaml values-vespa.yaml
# Default values for lumen.
# This is a YAML-formatted file.
# Declare variables to be passed into your templates (provided by admin user).
# JWT secret key for API call (signature) verification (at least 256 bits / 32 chars)
# Can be generated by running `openssl rand -base64 32` in your terminal
jwtSecretKey: "add-your-jwt-secret-key-here"
# Secret salts for generating Vespa document IDs
# Can be generated by running `openssl rand -base64 32` in your terminal
secretSalts: "add-your-secret-salts-here"
# See also scripts/config-oidc.sh helper script to obtain some of the values below
oidc:
provider: "add-your-provider-here"
endpoint: "add-your-endpoint-here"
clientId: "add-your-id-here"
clientSecret: "add-your-secret-here"
# If running behind a reverse proxy, this should be set to the URL the end user will
# use to access the product.
reverseProxyUrl: ""
# The ACME Cluster Issuer for LetsEncrypt requires an email address to be provided
# for certificate notifications. This is required for LetsEncrypt certificates to work properly.
# Common examples would be an admin or technical support email address for your organization. ex: "admin@example.com" or "engineering@example.com".
letsencrypt:
email: "letsencrypt@example.com"
For the jwtSecretKey and secretSalts values any 256 bit (32 character) string can be used. These values are used to sign JWT tokens used by the web application and atolioctl tool and salt document IDs in Atolio’s database. They should be well guarded secrets that are unique to the deployment.
If your users will be accessing the web interface via a reverse proxy (e.g. such as StrongDM), then be sure to set the reverseProxyUrl field to reflect the URL they will actually enter into their browser to access Atolio, which will be different to the hostname defined in lumen_domain_name. Leave this field empty if not using a reverse proxy.
The ACME Cluster Issuer for LetsEncrypt requires an email address to be provided for certificate notifications. If the default @example.com email address is used, then the Cluster Issuer will fail to register for certificate management so be sure to provide a valid email address.
Deployment with create-infra.sh Script
Once you have all variables configured, you can create the infrastructure and deploy the GKE cluster. From the deploy/terraform/gcp directory:
./scripts/create-infra.sh --name=acmecorp
This will create the infrastructure in the us-central1 GCP region. If you want to deploy in another region parameter (e.g. us-west2) an additional parameter can be provided:
./scripts/create-infra.sh --name=acmecorp --region=us-west2
The --name argument is used to generate a deployment name for tagging resources and naming the GCP resources. So make sure it is unique across all deployments. (i.e. using a globally unique deployment name). Typically this is set to your company name with an optional suffix if specifying environment (e.g. acmecorp or acmecorp-qa).
The script automates the following steps (parameterized based on the provided deployment name):
- Create a Google Cloud Storage bucket to store Terraform state
- Create a
terraform.tfvarsfile for Terraform based on theconfig.hclfile - Run
terraform init - Run
terraform apply(using input variables in generated terraform.tfvars)
Post-Deployment Steps
With the infrastructure created, you’ll want to update your local kubeconfig with a context for the Atolio cluster (this is also output via Terraform as update_kubeconfig_command):
gcloud container clusters get-credentials lumen-{deployment-name} --region us-central1 --project {your-gcp-project-id}
Grant Container Registry Access
The Atolio infrastructure creates the service accounts that pull Atolio container images: one per application service, plus the GKE node service account. Once they exist, Atolio grants them read access to the Atolio container registry by applying the artifact-support-only configuration from terraform-lumen against Atolio’s own atolio-public project:
cd terraform-lumen/examples/gcp/artifact-support-only
terraform init
terraform apply \
-var project_id=your-gcp-project-id \
-var deployment_name=acmecorp \
-var artifact_role_display_name="Acme Corp"
This step is performed by Atolio, not by your team, as it requires credentials to Atolio’s atolio-public project. Notify your Atolio support team once the infrastructure apply has completed so they can run it. Pods will remain in ImagePullBackOff until it has been applied.
It grants roles/artifactregistry.reader to the following service accounts in your project:
- Application service accounts:
{deployment-name}-feeder,-marvin,-docex,-source,-tika-pipes,-external-dns,-ext-secrets - GKE node service account:
{deployment-name}-gke-node
If your deployment does not name its service accounts using the {deployment-name}-{service} convention, Atolio can apply either half independently with -var grant_pod_service_accounts=false or -var grant_node_service_account=false.
Delegate Responsibility for Atolio Subdomain
The parent domain (e.g. example.com) needs to delegate traffic to the new Atolio subdomain (search.example.com). This is achieved by adding an NS record to the parent domain with the 4 name servers copied from the new subdomain.
These nameservers can be retrieved post-creation with terraform output:
terraform output --json name_servers | jq -r '.[]'
Deployment Verification
At this point you should be able to interact with the Kubernetes cluster and see Atolio pods deployed, e.g.
kubectl get po -n atolio-svc
Note, Atolio specific services run on the following namespaces:
- atolio-svc (Application Services)
- atolio-db (Database)
- atolio-ctl (Control Plane)
When you have validated that the infrastructure is available, the next step is to configure sources.