These guides cover deploying Atolio on managed Kubernetes in the public cloud. Pick the page for your provider; each is intended to be followed in linear order. For cluster sizing and node requirements, see Hardware Requirements, and review the Deployment Model Overview to decide between Atolio managed and customer managed deployment.
This is the multi-page printable view of this section. Click here to print.
Cloud
Deployment guides for Atolio on managed Kubernetes in the public cloud (AWS, Azure, and GCP), where Atolio’s Terraform provisions the cluster and supporting infrastructure for you.
1 - AWS Deployment
This document describes the deployment of the required micro services into AWS. It is intended to be followed in linear order, skipping any steps not relevant to the particular deployment.
Architecture

Deployment Prerequisites
In order to get started, your Atolio support team will do the following on your behalf:
- Grant your AWS account access to the Client ECR repos (for pulling Docker images).
- Add your Deployment Engineer as a collaborator to the Atolio GitHub repository (lumen-infra), which contains:
- Deployment documentation
- Terraform for the Atolio stack infrastructure
- Configuration files for Atolio services
- Maintenance scripts
The following deployment prerequisites will help streamline your deployment process.
Determine AWS account
You can either choose to deploy Atolio into an existing AWS account or a new account. Atolio also supports deploying to your own AWS Virtual Private Cloud (VPC). When the account is available, share the AWS account number with your Atolio support team.
We recommend:
- Ensuring that Service Quotas within your AWS account allow for a minimum of 64 vCPU for On-Demand Standard instances. See Hardware Requirements for the full list of recommended quotas.
- Raising any other organizational AWS policies / restrictions (e.g. networking, containers) with your Atolio support team ahead of the deployment call.
Determine Deployment Model
We offer both Atolio managed and customer managed deployment models for you to choose from. Please review the comparison and requirements for each approach on our Deployment Model Overview page and inform your Atolio support team which method you’d like to use for your deployment.
Atolio Managed Deployment Prerequisites
The exact permissions being delegated will be presented to the engineer running the script prior to executing. The IAM policies included are:
arn:aws:iam::aws:policy/PowerUserAccess
arn:aws:iam::aws:policy/IAMFullAccess
Access will be limited to a client support machine that is only accessible to Atolio support engineers and that has a static IP of 52.43.209.253 assigned to aid in identifying activity from Atolio’s team.
If you opt to allow Atolio’s deployment support team to manage the deployment on your behalf the steps to enable this for your AWS account are as follows:
Clone our lumen-infra GitHub repository
git clone git@github.com:atolio/lumen-infra.gitRun our AWS support role script against the AWS account you’d like us to deploy into
./lumen-infra/deploy/terraform/aws/scripts/atolio-support-role.shReview the output from the script and provide the Role ARN to your Atolio support team
Operation completed successfully.
Role ARN: arn:aws:iam::123456789012:role/AtolioDeploymentAccess
Determine Atolio DNS name
Before the deployment call, you may want to decide on your desired Atolio web location. An AWS Route 53 hosted zone will be created in the AWS account used for hosting the Atolio stack (e.g. search.example.com.): this will be the DNS name (without the trailing dot) for the Atolio web application (e.g. https://search.example.com)
This hosted zone allows the deployment (i.e. the External DNS controller) to add records to link host names (e.g. search.example.com, feed.search.example.comand relay.search.example.com) to the load balancer as created by the AWS ALB controller.
For the remainder of this document, we will use https://search.example.com in the examples, but it is expected for you to replace with your own DNS name.
Determine Cloud Networking Options
By default, Atolio’s Terraform code will create a VPC. However, you may choose to use an existing VPC and subnets within your AWS account. In this case, set create_vpc to false.
Then, configure all VPC related variables. See below sample:
// Uncomment these lines and update the values in case you want to deploy in a
// pre-existing VPC (by default a new VPC will be created).
//
// Note that automatic subnet discovery for the ALB controller will only work
// if the subnets are tagged correctly as documented here:
// https://kubernetes-sigs.github.io/aws-load-balancer-controller/v2.7/deploy/subnet_discovery/
// create_vpc             = false
// vpc_id                 = "vpc-000"
// vpc_cidr_block         = "10.42.0.0/20"
// vpc_private_subnet_ids = ["subnet-1111", "subnet-2222"]
// vpc_public_subnet_ids  = ["subnet-3333", "subnet-4444"]
// vespa_az                = "us-west-2a"
// vespa_private_subnet_id = "subnet-1111"
Additional notes regarding existing VPC usage:
- As per above sample, subnets must be tagged corectly as documented in subnet discovery.
- When specifying
vespa_private_subnet_id, the referenced subnet ID must also be in thevpc_private_subnet_idsarray. - In terms of VPC sizing, the default of
10.42.0.0/20(4,096 addresses) is consistent across AWS, Azure, and GCP deployments and provides ample room for growth. VPC subnet IP addresses are primarily allocated to the EKS cluster and ALB, with AWS reserving several for internal services. We recommend a subnet of/22(1,024 IPs) as the minimum to ensure enough available IP addresses for Kubernetes to assign to pods as your deployment scales — a/20VPC fits four/22subnets, which covers the standard public/private split across availability zones. Smaller subnet sizes may lead to IPv4 address exhaustion as pod counts increase. - Ensure specified subnets have available IPv4 Addresses.
If custom networking configuration will be necessary be sure to provide these details to the engineer performing the deployment.
Determine EKS API endpoint access CIDRs
Set eks_cluster_endpoint_public_access_cidrs in config.hcl before running create-infra.sh. See below for more information on this file.
This is a required configuration step for every AWS deployment. The deployment engineer must decide which public source IPs or CIDR ranges are allowed to reach the EKS cluster API.
At a minimum, add an entry like this and replace the value with the public IP or CIDR block that should be allowed to administer the cluster:
# This example uses a non-functional CIDR from TEST-NET-3, you must change to a valid access CIDR for your organization
eks_cluster_endpoint_public_access_cidrs = ["203.0.113.10/32"]
If Atolio will perform the deployment on your behalf, include the Atolio deployment support IP:
eks_cluster_endpoint_public_access_cidrs = ["52.43.209.253/32"]
If both Atolio and your team need access during deployment, include both entries in the list.
Setup authentication
Atolio supports single sign-on (SSO) authentication through Okta, Microsoft Entra ID, and Google using the OpenID Connect (OIDC) protocol.
Refer to Configuring Authentication for more details on the steps to complete in your desired SSO provider in order to obtain the necessary OIDC configuration values.
Setup local environment
Finally, if an engineer from your team will be performing the deployment, ensure they have the following utilities installed:
- Setup Terraform on your local machine as described on the HashiCorp docs site - we require v1.5.0 at a minimum.
- Install the AWS Command Line Interface
- Install kubectl
- Install Helm
- Install atolioctl
Provide Deployment Engineer with Configuration
At this point if you’re proceeding with an Atolio managed deployment you’ll need to provide the information from these prerequisite steps to your Atolio deployment support team. Otherwise please ensure the information is provided to the engineer from your organization who will be performing the deployment with Atolio’s support.
To recap, provide these details:
If you’re opting to have Atolio manage the deployment you can disregard the remainder of this documentation as these steps will be performed by your Atolio deployment engineer. Otherwise be sure to share this documentation with the engineer from your organization that will be performing the deployment so they can familarize theirself with the steps required.
Create Cloud Infrastructure
The Terraform configuration requires an external (S3) bucket to store state. A script is available to automate the whole process (including running Terraform). Before running the script, create a config.hcl file based on the provided config.hcl.template:
cd deploy/terraform/aws
cp ./config.hcl.template config.hcl
Atolio Domain Name
Update the copied file with appropriate values. At a minimum, it should look something like this:
# Domain name for Atolio stack (same as hosted zone name without trailing ".")
lumen_domain_name = "search.example.com"
Application Helm Value Options
Next copy the Helm template and update the values as directed.
cp ./templates/values-lumen-admin.yaml values-lumen.yaml
cp ./templates/values-vespa-admin.yaml values-vespa.yaml
# Default values for lumen.
# This is a YAML-formatted file.
# Declare variables to be passed into your templates (provided by admin user).

# JWT secret key for API call (signature) verification (at least 256 bits / 32 chars)
# Can be generated by running `openssl rand -base64 32` in your terminal
jwtSecretKey: "add-your-jwt-secret-key-here"

# Secret salts for generating Vespa document IDs
# Can be generated by running `openssl rand -base64 32` in your terminal
secretSalts: "add-your-secret-salts-here"

# Secret salt keying log redaction, so redacted log values cannot be recovered
# by hashing candidates. Generate with `openssl rand -base64 32`
logRedactionSalt: "add-your-log-redaction-salt-here"

# See also scripts/config-oidc.sh helper script to obtain some of the values below
oidc:
  provider: "add-your-provider-here"
  endpoint: "add-your-endpoint-here"
  clientId: "add-your-id-here"
  clientSecret: "add-your-secret-here"

# If running behind a reverse proxy, this should be set to the URL the end user will
# use to access the product.
reverseProxyUrl: ""

# The ACME Cluster Issuer for LetsEncrypt requires an email address to be provided
# for certificate notifications. This is required for LetsEncrypt certificates to work properly.
# Common examples would be an admin or technical support email address for your organization. ex: "admin@example.com" or "engineering@example.com".
letsencrypt:
  email: "letsencrypt@example.com"
For the jwtSecretKey, secretSalts and logRedactionSalt values any 256 bit (32 character) string can be used. These values are used to sign JWT tokens used by the web application and atolioctl tool, salt document IDs in Atolio’s database, and key the redaction of sensitive strings in logs. They should be well guarded secrets that are unique to the deployment.
Without logRedactionSalt the redacted fields in logs are replaced with a placeholder rather than a hash, because an unsalted hash of a low entropy value such as an email address can be reversed by hashing candidate values.
If your users will be accessing the web interface via a reverse proxy (e.g. such as StrongDM), then be sure to set the reverseProxyUrl field to reflect the URL they will actually enter into their browser to access Atolio, which will be different to the hostname defined in lumen_domain_name. Leave this field empty if not using a reverse proxy.
Deployment with create-infra.sh script
Once you have all variables configured, you can create the infrastructure and deploy the k8s cluster. From the deploy/terraform/aws directory:
./scripts/create-infra.sh --name=deployment-name
This will create the infrastructure in the us-west-2 AWS region. If you want to deploy in another region parameter (e.g. us-east-1) an additional parameter can be provided:
./scripts/create-infra.sh --name=deployment-name --region=us-east-1
The deployment-name argument is used to generate a deployment name for e.g. tagging resources and naming e.g. the kubernetes cluster and S3 buckets. So make sure it is unique across all deployments. (i.e. using a globally unique deployment name). Typically this is set to your company name with an optional suffix if specifying environment (e.g. acmecorp or acmecorp-qa).
The script automates the following steps (parameterized based on the provided deployment name):
- Create an S3 bucket to store Terraform state
- Create a terraform.tfvars file for Terraform
- Run
terraform init - Run
terraform apply(using input variables in generated terraform.tfvars)
Post-deployment steps
With the infrastructure created, you’ll want to update your local kubeconfig with a context for the Atolio cluster (this is also output via Terraform as update_kubeconfig_command):
aws --profile {atolio profile} eks update-kubeconfig --region us-west-2 --name lumen-{deployment-name}
Delegate responsibility for Atolio subdomain
The parent domain (e.g. example.com) needs to delegate traffic to the new Atolio subdomain (search.example.com). This is achieved by adding an NS record to the parent domain with the 4 name servers copied from the new subdomain (similar to what is described here).
These nameservers can be retrieved post-creation with terraform output:
terraform output --json name_servers | jq -r '.[]'
At this point you should be able to interact with the kubernetes cluster, e.g.
kubectl get po -n atolio-svc
Note, Atolio specific services run on the following namespaces:
- atolio-svc (Services)
- atolio-db (Database)
- atolio-ctl (Control Plane)
When you have validated that the infrastructure is available, the next step is to configure sources.
2 - Azure Deployment
This document describes the deployment of the required Atolio services into your Azure subscription. It is intended to be followed in linear order, skipping any steps not relevant to the particular deployment.
Architecture

Deployment Prerequisites
Before getting started, Atolio needs to have done the following on your behalf:
- Add your Deployment Engineer as a collaborator to the Atolio
terraform-lumenGitHub repository, which contains the Terraform used to grant Atolio support access to your Azure subscription - Add your Deployment Engineer as a collaborator to the Atolio GitHub repository (lumen-infra), which contains:
- Deployment documentation
- Terraform for the Atolio stack infrastructure
- Configuration files for Atolio services
- Maintenance scripts
- Provide image pull credentials for the Atolio Client Container Registry (for pulling Atolio container images)
The following deployment prerequisites will help streamline your deployment process.
Determine Azure Subscription
You can choose to deploy Atolio into a new or an existing Azure subscription. We recommend a dedicated subscription, as this keeps your Atolio deployment and its permissions separate from your other resources. Atolio will deploy into a new Azure Resource Group (RG), with another RG created automatically by Azure Kubernetes Service (AKS) for the cluster. When the subscription is available, share the subscription ID and your Azure tenant ID with your Atolio support team.
We recommend:
- Ensuring that Service Quotas within your Azure subscription allow for a minimum of 64 vCPU under the Total Regional vCPUs quota. See Hardware Requirements for the full list of recommended quotas.
- Raising any other organizational Azure policies / restrictions (e.g. networking, containers, storage account key access) with your Atolio support team ahead of the deployment call.
Determine Deployment Model
We offer both Atolio managed and customer managed deployment models for you to choose from. Please review the comparison and requirements for each approach on our Deployment Model Overview page and inform your Atolio support team which method you’d like to use for your deployment.
Grant Atolio Support Access
Atolio’s deployment support team needs scoped access to your Azure subscription in order to deploy and support the Atolio stack. This access is granted with Azure Lighthouse, using a standalone Terraform configuration in the terraform-lumen repository. Atolio engineers sign in as themselves, in Atolio’s own tenant, from a restricted support machine; no application registration, service principal, or client secret is created in your tenant, and you can review or remove the delegation at any time.
Run this step before the deployment call, regardless of whether you have chosen the Atolio managed or customer managed deployment model. It must be run by someone who can assign roles in the subscription (e.g. Owner, or User Access Administrator and Contributor).
Clone the
terraform-lumenrepository:git clone git@github.com:atolio/terraform-lumen.gitSign in to your Azure tenant and select the subscription Atolio will deploy into:
az login --tenant your-tenant-id
az account set --subscription your-subscription-id
Create a
terraform.tfvarsfile in thesupport-onlydirectory describing your subscription and deployment:cd terraform-lumen/examples/azure/support-onlydeployment_name = "acmecorp" customer_name = "Acme Corp" region = "westus3"Use the same
deployment_nameyou intend to use for the rest of the deployment (the--namepassed tocreate-infra.sh). Typically this is your company name, with an optional suffix if you’re specifying an environment (e.g.acmecorporacmecorp-qa). Use the Azure region you intend to deploy Atolio into forregion.Apply the configuration. Terraform picks up
terraform.tfvarsautomatically, and deploys into the subscription selected above:terraform init terraform applyTerraform will display everything it creates in the plan output before you approve the apply.
Provide the resulting outputs to your Atolio support team:
terraform outputatolio_support_subscription_id = "your-subscription-id" atolio_support_lighthouse_definition_id = "/subscriptions/your-subscription-id/providers/Microsoft.ManagedServices/registrationDefinitions/..." atolio_support_contributor_role_id = "00000000-0000-0000-0000-000000000000" atolio_support_user_access_administrator_role_id = "00000000-0000-0000-0000-000000000000" atolio_support_role_assigner_identity_id = "/subscriptions/your-subscription-id/resourceGroups/acmecorp-atolio-support/providers/Microsoft.ManagedIdentity/userAssignedIdentities/acmecorp-atolio-role-assigner" atolio_support_subscription_tags = { ... } atolio_support_customer_deployment_name = "acmecorp" atolio_support_customer_deployment_region = "westus3"The deployment name and region are the values Atolio will use when deploying the stack with
create-infra.sh.
What Atolio Is Granted
Azure Lighthouse only accepts Azure built-in roles, so the delegation is made up of the following:
- Contributor on the subscription, for day-to-day deployment and support operations.
- User Access Administrator, restricted to assigning only Contributor, Reader, Network Contributor, AcrPull and DNS Zone Contributor, and only to managed identities in your subscription. The deployment uses this to give its AKS, ingress and workload identities the roles they need. It cannot be used to grant Owner, to grant anything broader than Contributor, or to grant access to users or groups.
Azure Lighthouse cannot delegate roles that grant access to data (roles with DataActions), but Atolio’s services need Storage Blob Data Contributor and Storage Blob Data Reader on their storage containers. The configuration therefore also creates a managed identity, {deployment-name}-atolio-role-assigner, in a new {deployment-name}-atolio-support resource group. It holds Role Based Access Control Administrator on the subscription with a condition that only allows it to assign or remove those two Storage Blob Data roles, and only to managed identities. During the deployment it creates the per-container storage role assignments for Atolio’s services.
The configuration also tags the subscription with atolio:* tags (customer, deployment and so on) so Atolio can identify it.
Reviewing or Removing Access
The delegation is listed in the Azure portal under Service providers → Delegations. To remove Atolio’s access, run terraform destroy from the same support-only directory, or remove the delegation from the portal.
Determine Atolio DNS Name
Before the deployment call, you may want to decide on your desired Atolio web address. An Azure DNS Zone will be created in the Azure subscription used for hosting the Atolio stack (e.g. search.example.com.): this will be the DNS name (without the trailing dot) for the Atolio web application (e.g. https://search.example.com).
This DNS zone allows the deployment control plane (i.e. the External DNS controller) to add records to link host names (e.g. search.example.com, feed.search.example.com and relay.search.example.com) to the Ingress controller used for the deployment. If your DNS is managed in Cloudflare instead, records can be managed there; let your Atolio support team know.
For the remainder of this document, we will use https://search.example.com in the examples, but it is expected for you to replace with your own DNS name.
Determine Cloud Networking Options
By default, Atolio’s Terraform code will create a VNet in your Azure subscription. However, you may choose to use an existing VNet and subnets within your Azure subscription. In this case, set create_vnet to false in the config.hcl file during the deployment, and configure all three VNet IDs. See this example from config.hcl:
# Uncomment these lines and update the values in case you want to deploy in a
# pre-existing VNet (by default a new VNet will be created). All three IDs are
# required when create_vnet is false.
# create_vnet = false
# vnet_id = "/subscriptions/{subscriptionId}/resourceGroups/{resourceGroup}/providers/Microsoft.Network/virtualNetworks/{vnetName}"
# vnet_private_subnet_id = "/subscriptions/{subscriptionId}/resourceGroups/{resourceGroup}/providers/Microsoft.Network/virtualNetworks/{vnetName}/subnets/{privateSubnetName}"
# vnet_public_subnet_id = "/subscriptions/{subscriptionId}/resourceGroups/{resourceGroup}/providers/Microsoft.Network/virtualNetworks/{vnetName}/subnets/{publicSubnetName}"
Optionally, when create_vnet is not set to false you can customize the default VNet and subnet CIDR blocks if you have specific requirements. See this example from config.hcl:
# Uncomment these lines and update the values to customize the CIDR blocks of the
# VNet and subnets created automatically (ignored when create_vnet = false)
# vnet_cidr = "10.42.0.0/20"
# vnet_private_subnet_block = "10.42.0.0/22" # AKS pod subnet
# vnet_public_subnet_block = "10.42.4.0/24" # Application Gateway subnet
AKS uses Azure CNI, so every pod takes an IP address from the pod subnet; keep it at least a /22.
If custom networking configuration will be necessary be sure to provide these details to the engineer performing the deployment.
Setup Authentication
Atolio supports single sign-on (SSO) authentication through Okta, Microsoft Entra ID, and Google using the OpenID Connect (OIDC) protocol.
Refer to Configuring Authentication for more details on the steps to complete in your desired SSO provider in order to obtain the necessary OIDC configuration values.
If using Microsoft Entra ID, the OIDC client ID and client secret will be the respective values created and saved during Azure AD - Create New App Registration.
Setup Local Environment
Finally, if an engineer from your team will be performing the deployment, ensure they have the following utilities installed:
- Setup Terraform on your local machine as described on the HashiCorp docs site - we require v1.6.0 at a minimum.
- Install the Azure Command Line Interface
- Install kubectl
- Install Helm
- Install atolioctl
Note: If you are running on Windows, you may also need to install the Windows Subsystem for Linux.
Provide Deployment Engineer with Configuration
At this point if you’re proceeding with an Atolio managed deployment you’ll need to provide the information from these prerequisite steps to your Atolio deployment support team. Otherwise please ensure the information is provided to the engineer from your organization who will be performing the deployment with Atolio’s support.
To recap, provide these details:
- Azure subscription ID and tenant ID
- Atolio support access outputs and the deployment name and region you used
- Atolio DNS name
- OIDC Configuration
- (Optional) Custom Cloud Networking Options
If you’re opting to have Atolio manage the deployment you can disregard the remainder of this documentation as these steps will be performed by your Atolio deployment engineer. Otherwise be sure to share this documentation with the engineer from your organization that will be performing the deployment so they can familiarize themselves with the steps required.
Create Cloud Infrastructure
Note: Atolio requires an Azure region with 3 availability zones. You can check which regions include support for multiple availability zones here.
The Terraform configuration requires an Azure storage account to store state. A script is available to automate the whole process (including running Terraform). Before running the script, create a config.hcl file based on the provided config.hcl.template:
cd deploy/terraform/azure
cp ./config.hcl.template config.hcl
Atolio Domain Name and Image Pull Secrets
Update the copied file with appropriate values. At a minimum, it should look something like this:
# Domain name for Atolio stack (same as hosted zone name without trailing ".")
lumen_domain_name = "search.example.com"
# The registry from which to pull container images for services
container_registry = "atolioimages.azurecr.io"
image_pull_username = "provided-by-atolio"
image_pull_password = "provided-by-atolio"
Your Atolio support team will share the appropriate values for the image_pull_username and image_pull_password values.
(Optional) Lite Mode
For proofs of concept, demos and development environments, Atolio can run on 2 AKS node pools instead of the 6 used in production: one for Lumen and embedding services, and one for Vespa and Tika. Each defaults to a single Standard_D8ps_v6 (8 vCPU, 32 GB) node, with an optional GPU embedder. Lite mode is meant for small-to-moderate document volumes where high availability isn’t needed, and it doesn’t replace the production layout at scale.
To enable it, set lite_mode = true in config.hcl. The LITE MODE section of config.hcl.template lists the optional sizing settings.
New deployments only
Lite mode must be chosen before the first deployment. Turning it on or off for an existing deployment replaces the AKS cluster, and all Vespa data is lost.
Application Helm Value Options
Next copy the Helm template and update the values as directed.
cp ./templates/values-lumen-admin.yaml values-lumen.yaml
cp ./templates/values-vespa-admin.yaml values-vespa.yaml
# Default values for lumen.
# This is a YAML-formatted file.
# Declare variables to be passed into your templates (provided by admin user).
# JWT secret key for API call (signature) verification (at least 256 bits / 32 chars)
# Can be generated by running `openssl rand -base64 32` in your terminal
jwtSecretKey: "add-your-jwt-secret-key-here"
# Secret salts for generating Vespa document IDs
# Can be generated by running `openssl rand -base64 32` in your terminal
secretSalts: "add-your-secret-salts-here"
# Secret salt keying log redaction, so redacted log values cannot be recovered
# by hashing candidates. Generate with `openssl rand -base64 32`
logRedactionSalt: "add-your-log-redaction-salt-here"
# See also scripts/config-oidc.sh helper script to obtain some of the values below
oidc:
provider: "add-your-provider-here"
endpoint: "add-your-endpoint-here"
clientId: "add-your-id-here"
clientSecret: "add-your-secret-here"
# Use the Atolio provided image pull secrets for accessing Atolio container images
imagePullSecret:
create: true
# If running behind a reverse proxy, this should be set to the URL the end user will
# use to access the product.
reverseProxyUrl: ""
# The ACME Cluster Issuer for LetsEncrypt requires an email address to be provided
# for certificate notifications. This is required for LetsEncrypt certificates to work properly.
letsencrypt:
email: "letsencrypt@example.com"
dns01:
azureDNS:
environment: AzurePublicCloud
For the jwtSecretKey, secretSalts and logRedactionSalt values any 256 bit (32 character) string can be used. These values are used to sign JWT tokens used by the web application and atolioctl tool, salt document IDs in Atolio’s database, and key the redaction of sensitive strings in logs. They should be well guarded secrets that are unique to the deployment.
Without logRedactionSalt the redacted fields in logs are replaced with a placeholder rather than a hash, because an unsalted hash of a low entropy value such as an email address can be reversed by hashing candidate values.
If your users will be accessing the web interface via a reverse proxy (e.g. such as StrongDM), then be sure to set the reverseProxyUrl field to reflect the URL they will actually enter into their browser to access Atolio, which will be different to the hostname defined in lumen_domain_name. Leave this field empty if not using a reverse proxy.
The ACME Cluster Issuer for LetsEncrypt requires an email address to be provided for certificate notifications. If the default @example.com email address is used, then the Cluster Issuer will fail to register for certificate management so be sure to provide a valid email address.
Deployment with create-infra.sh Script
Once you have all variables configured, sign in to Azure and select the subscription to deploy into. From the deploy/terraform/azure directory:
az account set --subscription your-subscription-id
./scripts/create-infra.sh --name=acmecorp
This will create the infrastructure in the westus3 Azure region. If you want to deploy in another region (e.g. eastus) an additional parameter can be provided:
./scripts/create-infra.sh --name=acmecorp --region=eastus
The --name argument is used to define a deployment name for collecting resources into an Azure Resource Group containing the Kubernetes cluster, networking, storage, etc. It must match the deployment_name used when granting Atolio support access. Typically this is set to your company name with an optional suffix if specifying environment (e.g. acmecorp or acmecorp-qa).
The script automates the following steps (parameterized based on the provided deployment name):
- Create a resource group, and an Azure storage account to store Terraform state
- Create a
terraform.tfvarsfile for Terraform based on theconfig.hclfile - Run
terraform init - Run
terraform apply(using input variables in generated terraform.tfvars)
Before making any changes, the script shows the subscription, tenant and account it will deploy with, and whether it is running through Azure Lighthouse, and asks for confirmation.
Deploying Directly or Through Azure Lighthouse
The same script is used whether the deployment is run by your own team or by Atolio, and it detects which applies from the current az sign-in:
- Customer managed: an engineer signed in to your own tenant, with Owner (or User Access Administrator and Contributor) on the subscription, runs the script. All role assignments are made directly.
- Atolio managed: an Atolio engineer signed in to Atolio’s tenant runs the script through the Azure Lighthouse delegation. Role assignments for Atolio’s services are made within the limits of the delegation, and the Storage Blob Data role assignments are made by the role assigner identity created when granting Atolio support access.
The first run records the subscription, your tenant and, for an Atolio managed deployment, Atolio’s tenant in settings.sh. Later runs of create-infra.sh and destroy-infra.sh stop if the current sign-in doesn’t match, so a deployment can’t accidentally be pointed at a different subscription or switched between the two models. To make such a change intentionally, pass --force.
Post-Deployment Steps
With the infrastructure created, you’ll want to update your local kubeconfig with a context for the Atolio cluster (this is also output via Terraform as update_kubeconfig_command):
az aks get-credentials --name lumen-{deployment-name} --resource-group lumen-{deployment-name}
Delegate Responsibility for Atolio Subdomain
The parent domain (e.g. example.com) needs to delegate traffic to the new Atolio subdomain (search.example.com). This is achieved by adding an NS record to the parent domain with the 4 name servers copied from the new subdomain.
These nameservers can be retrieved post-creation with terraform output:
terraform output --json name_servers | jq -r '.[]'
Deployment Verification
At this point you should be able to interact with the Kubernetes cluster and see Atolio pods deployed, e.g.
kubectl get po -n atolio-svc
Note, Atolio specific services run on the following namespaces:
- atolio-svc (Application Services)
- atolio-db (Database)
- atolio-ctl (Control Plane)
When you have validated that the infrastructure is available, the next step is to configure sources.
3 - GCP Deployment
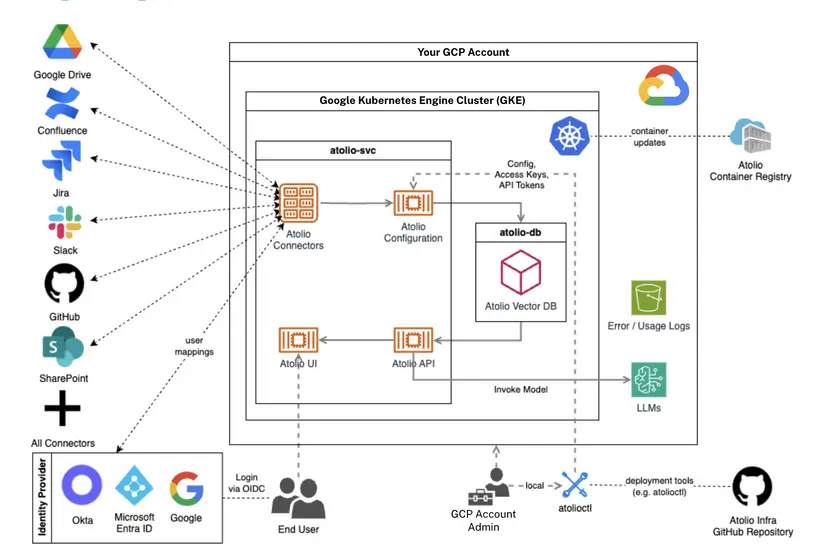
This document describes the deployment of the required Atolio services into Google Cloud Platform (GCP). This document is intended to be followed in linear order, skipping any steps not relevant to the particular deployment.
Architecture
Deployment Prerequisites
Before getting started, Atolio needs to have done the following on your behalf:
- Add your Deployment Engineer as a collaborator to the Atolio
terraform-lumenGitHub repository, which contains the Terraform used to grant Atolio support access to your GCP project - Add your Deployment Engineer as a collaborator to the Atolio GitHub repository (lumen-infra), which contains:
- Deployment documentation
- Terraform for the Atolio stack infrastructure
- Configuration files for Atolio services
- Maintenance scripts
- Ensure your GCP project has sufficient quota for the required resources, particularly Compute Engine API and Google Kubernetes Engine API. See Hardware Requirements for the full list of recommended quotas.
Access to the Atolio Client Container Registry (for pulling Atolio container images) is granted later in the process, once your deployment has created the service accounts that need it. See Grant container registry access.
The following deployment prerequisites will help streamline your deployment process.
Determine GCP Project
We recommend you create a new GCP project to host Atolio, as this will help keep your Atolio deployment and other resources separate from your production environment. When the project is available, share the GCP project ID and number with your Atolio support team.
Please give the project a distinct ID that clearly identifies your company, for example acmecorp-atolio or acmecorp-atolio-prod. The project ID is carried into the names of every service account the deployment creates, such as acmecorp-atolio-support@acmecorp-atolio.iam.gserviceaccount.com, and those service accounts are granted access to shared Atolio infrastructure alongside those of every other customer.
A generic project ID such as atolio or search gives us very little to go on when we need to work out which identity belongs to which customer. Naming the project after your company keeps that unambiguous and makes support and troubleshooting considerably faster.
Determine Deployment Model
We offer both Atolio managed and customer managed deployment models for you to choose from. Please review the comparison and requirements for each approach on our Deployment Model Overview page and inform your Atolio support team which method you’d like to use for your deployment.
Grant Atolio Support Access
Atolio’s deployment support team needs scoped access to your GCP project in order to deploy and support the Atolio stack. This access is granted by a standalone Terraform configuration in the terraform-lumen repository, which creates an Atolio Deployment Support custom IAM role and a dedicated support service account in your project. Atolio engineers impersonate that service account, so they are never granted standing access to your project as users.
Run this step before the deployment call, regardless of whether you have chosen the Atolio managed or customer managed deployment model.
Clone the
terraform-lumenrepository:git clone git@github.com:atolio/terraform-lumen.gitCreate a
terraform.tfvarsfile in thesupport-onlydirectory describing your project and deployment:cd terraform-lumen/examples/gcp/support-onlyproject_id = "your-gcp-project-id" deployment_name = "acmecorp" region = "us-central1"Use the same
deployment_nameyou intend to use for the rest of the deployment. Typically this is your company name, with an optional suffix if you’re specifying an environment (e.g.acmecorporacmecorp-qa).Using the Google Workspace Connector?If your deployment will index Google Workspace (Gmail, Google Drive, Google Calendar), you must also set
enable_google_connector_support = trueinterraform.tfvars:enable_google_connector_support = trueThis adds the
iam.serviceAccountKeys.*andpubsub.*permissions that the Google connector requires. If you’re not deploying the Google Workspace connector, leave this setting out entirely.Apply the configuration against the GCP project you’d like Atolio to deploy into. Terraform picks up
terraform.tfvarsautomatically:terraform init terraform applyTerraform will display the exact permissions included in the custom role in the plan output before you approve the apply.
Provide the resulting outputs to your Atolio support team:
terraform outputatolio_support_service_account_email = "acmecorp-atolio-support@your-gcp-project-id.iam.gserviceaccount.com" atolio_support_custom_role_id = "projects/your-gcp-project-id/roles/acmecorp_deployment_support" atolio_support_customer_project_id = "your-gcp-project-id" atolio_support_customer_project_number = "123456789012" atolio_support_customer_deployment_name = "acmecorp" atolio_support_customer_deployment_region = "us-central1"The support service account email is the value you’ll need most often in the remaining steps.
Determine Atolio DNS Name
Before the deployment call, you may want to decide on your desired Atolio web address. A GCP Cloud DNS zone will be created in the GCP project used for hosting the Atolio stack (e.g. search.example.com.): this will be the DNS name (without the trailing dot) for the Atolio web application (e.g. https://search.example.com).
This Cloud DNS zone allows the deployment control plane (i.e. the External DNS controller) to add records to link host names (e.g. search.example.com, feed.search.example.comand relay.search.example.com) to the Ingress controller used for the deployment.
For the remainder of this document, we will use https://search.example.com in the examples, but it is expected for you to replace with your own DNS name.
Setup Authentication
Atolio supports single sign-on (SSO) authentication through Okta, Microsoft Entra ID, and Google using the OpenID Connect (OIDC) protocol.
Refer to Configuring Authentication for more details on the steps to complete in your desired SSO provider in order to obtain the necessary OIDC configuration values.
Setup Local Environment
Finally, if an engineer from your team will be performing the deployment, ensure they have the following utilities installed:
- Setup Terraform on your local machine as described on the HashiCorp docs site - we require v1.6.0 at a minimum.
- Install the Google Cloud SDK
- Install kubectl
- Install Helm
- Install atolioctl
Provide Deployment Engineer with Configuration
At this point if you’re proceeding with an Atolio managed deployment you’ll need to provide the information from these prerequisite steps to your Atolio deployment support team. Otherwise please ensure the information is provided to the engineer from your organization who will be performing the deployment with Atolio’s support.
To recap, provide these details:
- GCP project ID and number
- Atolio support service account email and the deployment name and region you used
- Atolio DNS name
- OIDC Configuration
If you’re opting to have Atolio manage the deployment you can disregard the remainder of this documentation as these steps will be performed by your Atolio deployment engineer. Otherwise be sure to share this documentation with the engineer from your organization that will be performing the deployment so they can familarize theirself with the steps required.
Create Cloud Infrastructure
The Terraform configuration requires an external (Google Cloud Storage) bucket to store state. A script is available to automate the whole process (including running Terraform). Before running the script, create a config.hcl file based on the provided config.hcl.template:
cd deploy/terraform/gcp
cp ./config.hcl.template config.hcl
Update the copied file with appropriate values. At a minimum, it should specify the zone you’re deploying to:
// Core Configuration
zone = "us-central1-f"
Atolio Support Access
The Atolio support role and service account were already created by the support-only configuration in terraform-lumen, so the equivalent resources in this configuration need to be disabled. If you leave them enabled the custom role ID collides and the apply fails. Point the configuration at the support service account that step produced:
# Support role/group binding is created by terraform-lumen's support-only
# configuration, not here.
atolio_support_enabled = false
# Support service account created by terraform-lumen's gcp/atolio-support module.
atolio_support_service_account_email = "acmecorp-atolio-support@your-gcp-project-id.iam.gserviceaccount.com"
Atolio Domain Name
Update the copied file with subdomain you will use for your Atolio deployment values:
# Domain name for Atolio stack (same as hosted zone name without trailing ".")
lumen_domain_name = "search.example.com"
Application Helm Value Options
Next copy the Helm template and update the values as directed.
cp ./templates/values-lumen-admin.yaml values-lumen.yaml
cp ./templates/values-vespa-admin.yaml values-vespa.yaml
# Default values for lumen.
# This is a YAML-formatted file.
# Declare variables to be passed into your templates (provided by admin user).
# JWT secret key for API call (signature) verification (at least 256 bits / 32 chars)
# Can be generated by running `openssl rand -base64 32` in your terminal
jwtSecretKey: "add-your-jwt-secret-key-here"
# Secret salts for generating Vespa document IDs
# Can be generated by running `openssl rand -base64 32` in your terminal
secretSalts: "add-your-secret-salts-here"
# Secret salt keying log redaction, so redacted log values cannot be recovered
# by hashing candidates. Generate with `openssl rand -base64 32`
logRedactionSalt: "add-your-log-redaction-salt-here"
# See also scripts/config-oidc.sh helper script to obtain some of the values below
oidc:
provider: "add-your-provider-here"
endpoint: "add-your-endpoint-here"
clientId: "add-your-id-here"
clientSecret: "add-your-secret-here"
# If running behind a reverse proxy, this should be set to the URL the end user will
# use to access the product.
reverseProxyUrl: ""
# The ACME Cluster Issuer for LetsEncrypt requires an email address to be provided
# for certificate notifications. This is required for LetsEncrypt certificates to work properly.
# Common examples would be an admin or technical support email address for your organization. ex: "admin@example.com" or "engineering@example.com".
letsencrypt:
email: "letsencrypt@example.com"
For the jwtSecretKey, secretSalts and logRedactionSalt values any 256 bit (32 character) string can be used. These values are used to sign JWT tokens used by the web application and atolioctl tool, salt document IDs in Atolio’s database, and key the redaction of sensitive strings in logs. They should be well guarded secrets that are unique to the deployment.
Without logRedactionSalt the redacted fields in logs are replaced with a placeholder rather than a hash, because an unsalted hash of a low entropy value such as an email address can be reversed by hashing candidate values.
If your users will be accessing the web interface via a reverse proxy (e.g. such as StrongDM), then be sure to set the reverseProxyUrl field to reflect the URL they will actually enter into their browser to access Atolio, which will be different to the hostname defined in lumen_domain_name. Leave this field empty if not using a reverse proxy.
The ACME Cluster Issuer for LetsEncrypt requires an email address to be provided for certificate notifications. If the default @example.com email address is used, then the Cluster Issuer will fail to register for certificate management so be sure to provide a valid email address.
Deployment with create-infra.sh Script
Once you have all variables configured, you can create the infrastructure and deploy the GKE cluster. From the deploy/terraform/gcp directory:
./scripts/create-infra.sh --name=acmecorp
This will create the infrastructure in the us-central1 GCP region. If you want to deploy in another region parameter (e.g. us-west2) an additional parameter can be provided:
./scripts/create-infra.sh --name=acmecorp --region=us-west2
The --name argument is used to generate a deployment name for tagging resources and naming the GCP resources. So make sure it is unique across all deployments. (i.e. using a globally unique deployment name). Typically this is set to your company name with an optional suffix if specifying environment (e.g. acmecorp or acmecorp-qa).
The script automates the following steps (parameterized based on the provided deployment name):
- Create a Google Cloud Storage bucket to store Terraform state
- Create a
terraform.tfvarsfile for Terraform based on theconfig.hclfile - Run
terraform init - Run
terraform apply(using input variables in generated terraform.tfvars)
Post-Deployment Steps
With the infrastructure created, you’ll want to update your local kubeconfig with a context for the Atolio cluster (this is also output via Terraform as update_kubeconfig_command):
gcloud container clusters get-credentials lumen-{deployment-name} --region us-central1 --project {your-gcp-project-id}
Grant Container Registry Access
The Atolio infrastructure creates the service accounts that pull Atolio container images: one per application service, plus the GKE node service account. Once they exist, Atolio grants them read access to the Atolio container registry by applying the artifact-support-only configuration from terraform-lumen against Atolio’s own atolio-public project:
cd terraform-lumen/examples/gcp/artifact-support-only
terraform init
terraform apply \
-var project_id=your-gcp-project-id \
-var deployment_name=acmecorp \
-var artifact_role_display_name="Acme Corp"
This step is performed by Atolio, not by your team, as it requires credentials to Atolio’s atolio-public project. Notify your Atolio support team once the infrastructure apply has completed so they can run it. Pods will remain in ImagePullBackOff until it has been applied.
It grants roles/artifactregistry.reader to the following service accounts in your project:
- Application service accounts:
{deployment-name}-feeder,-marvin,-docex,-source,-tika-pipes,-external-dns,-ext-secrets - GKE node service account:
{deployment-name}-gke-node
If your deployment does not name its service accounts using the {deployment-name}-{service} convention, Atolio can apply either half independently with -var grant_pod_service_accounts=false or -var grant_node_service_account=false.
Delegate Responsibility for Atolio Subdomain
The parent domain (e.g. example.com) needs to delegate traffic to the new Atolio subdomain (search.example.com). This is achieved by adding an NS record to the parent domain with the 4 name servers copied from the new subdomain.
These nameservers can be retrieved post-creation with terraform output:
terraform output --json name_servers | jq -r '.[]'
Deployment Verification
At this point you should be able to interact with the Kubernetes cluster and see Atolio pods deployed, e.g.
kubectl get po -n atolio-svc
Note, Atolio specific services run on the following namespaces:
- atolio-svc (Application Services)
- atolio-db (Database)
- atolio-ctl (Control Plane)
When you have validated that the infrastructure is available, the next step is to configure sources.